WordPress là một phần mềm mã nguồn mở được sử dụng để hỗ trợ việc xây dựng Wedsite và blog một cách nhanh chóng, được viết bằng ngôn ngữ lập trình PHP và sử dụng hệ quản trị cơ sở dử liệu MyQSL. Nó được rất nhiều người ủng hộ vì dễ sử dụng và nhiều tính năng hữu ích.
Chuẩn bị:
- 1 máy chạy hệ điều hành Centos 7
- Để thực hiện cài đặt WordPress, trước hết bạn phải cài đặt Nginx, MySQL, PHP( LEMP)
Tiến hành cài đặt:
Phần 1: Cài đặt Nginx, MySQL, PHP ( LEMP)
Bước 1: Kiểm tra tắt Selinux:
Ta sử dụng câu lệnh để kiểm tra trạng thái của Selinux:
# sestatus
Nếu Selinux ở trạng thái Disabled thì ta tiến hành chuyển qua bước tiếp theo.
Trong trường hợp Selinux vẫn đang ở trạng thái Enabled thì ta tiến hành tắt Selinux: Để tắt chức năng dịc vụ Selinux ta sẽ chỉnh sửa lại file /etc/selinux/config
# vi /etc/selinux/config
Thay đổi giá trị cấu hình SELINUX sang disabled.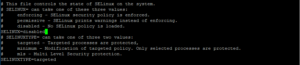 Thoát ra và lưu lại bằng :wp
Bạn cần reboot lại hệ thống để áp dụng cầu hình Selinux mới:
# reboot
Bước 2:
- Kiểm tra phiên bản Mariadb:
# yum info mariadb-server
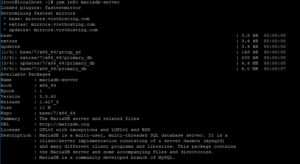 Hiện tại đã có sẵn bản mariadb 5.5 định cài ta tiến hành cài đặt luôn:
# yum install mariadb mariadb-server
Sau khi cài đặt ta tiến hành cho chạy luôn bằng lệnh:
# systemctl enable mariadb# systemctl start mariadb
 Tiếp đến ta tiến hành tạo database:
Thực hiện đổi password root của SQL và tăng bảo mật:
# mysql_secure_installation
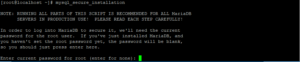 Password root chưa đặt nên ấn enter để tiếp tục và đặt password root.
Sau khi xong thiết lập, chạy SQL console để tạo db: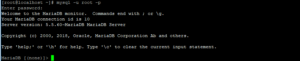 Đăng nhập tài khoản root và tạo user + Database cho site:
# mysql –u root –p
Tạo Database và gán quyền truy cập cho user từ localhost:
CREATE DATABASE wordpress;CREATE USER wordpressuser@localhost IDENTIFIED BY 'password';GRANT ALL PRIVILEGES ON wordpress.* TO wordpressuser@localhost IDENTIFIED BY 'password';FLUSH PRIVILEGES;Exit
 Bước 3:
Ta tiến hành cài đặt REMI Repo:
# yum install epel-release# rpm -Uvh http://rpms.famillecollet.com/enterprise/remi-release-7.rpm
 Tiếp theo ta sẽ cài PHP7.0 để có hiệu xuất cao nhất khi sử dụng:
Sửa file remi-php70.repo
/etc/yum.repos.d/remi-php70.repo
Sửa enable = 0 thành enable = 1 và save lại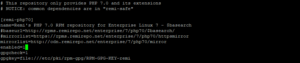 Cài PHP:
# yum -y install php-fpm php-common php-fpm-nginx php-gd php-json php-mbstring php-mcrypt php-opcache php-pecl-geoip php-pecl-redis php-xml php-mysqlnd php-cli php-soap php-pecl-memcached
Sau khi cài đặt xong, kiểm tra version php bằng lệnh:
# php -v
Cũng có thể kiểm tra các php module bằng lệnh:
# php –m
Bước 4:
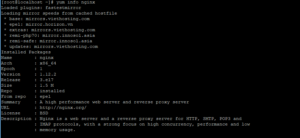
Cài đặt nginx:
# yum install nginx# chkconfig nginx on# chkconfig php-fpm on
 Xóa file config mặc định:
# rm -f /etc/nginx/nginx.conf
Tạo lại file config với nội dung sau: /etc/nginx/nginx.conf
# For more information on configuration, see:# * Official English Documentation: http://nginx.org/en/docs/# * Official Russian Documentation: http://nginx.org/ru/docs/user nginx;worker_processes 1;error_log /var/log/nginx/error.log;pid /var/run/nginx.pid;# Load dynamic modules. See /usr/share/nginx/README.dynamic.# include /usr/share/nginx/modules/*.conf;events { worker_connections 1024; use epoll; multi_accept on;}http { log_format main '$remote_addr - $remote_user [$time_local] "$request" ' '$status $body_bytes_sent "$http_referer" ' '"$http_user_agent" "$http_x_forwarded_for"'; access_log off; #access_log /var/log/nginx/access.log main; limit_conn_zone $binary_remote_addr zone=conn_limit_per_ip:10m; limit_conn_status 444; limit_req_zone $binary_remote_addr zone=req_limit_per_ip:10m rate=50r/s; limit_req_status 444; sendfile on; tcp_nopush on; tcp_nodelay on; types_hash_max_size 2048; client_body_buffer_size 16K; client_header_buffer_size 1k; client_max_body_size 128m; large_client_header_buffers 4 8k; client_body_timeout 24; client_header_timeout 24; keepalive_timeout 25; send_timeout 10; include /etc/nginx/mime.types; default_type application/octet-stream; # For sercurity, Hide Nginx Server Tokens/version Number server_tokens off; #turn Gzip On gzip on; gzip_static on; gzip_disable "MSIE [1-6]\."; gzip_vary on; gzip_proxied any; gzip_comp_level 6; gzip_buffers 16 8k; gzip_min_length 1000; gzip_http_version 1.1; gzip_types text/plain text/css application/json application/javascript text/xml application/xml application/xml+rss text/javascript; # File cache open_file_cache max=1000 inactive=20s; open_file_cache_valid 30s; open_file_cache_min_uses 5; open_file_cache_errors off; # Load modular configuration files from the /etc/nginx/conf.d directory. # See http://nginx.org/en/docs/ngx_core_module.html#include # for more information. include /etc/nginx/conf.d/*.conf;}Xóa các folder sau:
#rm -rf /etc/nginx/default.d/#rm -rf /etc/nginx/conf.d/
Tạo lại các folder tương ứng:
#mkdir -p /etc/nginx/conf/#mkdir -p /etc/nginx/conf.d/
Tạo file /etc/nginx/conf.d/php-fpm.conf có nội dung sau:
# PHP-FPM FastCGI server# network or unix domain socket configurationupstream php-fpm { # server 127.0.0.1:9000; server unix:/var/run/php-fpm/www.sock;}Tạo các rules tăng bảo mật cho wordpress:
File: /etc/nginx/conf/security.conf chặn các request bẩn:
## Only requests to our Host are allowed# if ($host !~ ^($server_name)$ ) {# return 444;# }## Only allow these request methods #### Do not accept DELETE, SEARCH and other methods ## if ($request_method !~ ^(GET|HEAD|POST)$ ) { return 444; }## Deny certain Referrers ### if ( $http_referer ~* (babes|forsale|girl|jewelry|love|nudit|organic|poker|porn|sex|teen) ) { return 404; return 403; }File /etc/nginx/conf/staticfile.conf Tạo rule cache các file tĩnh.
location ~* \.(3gp|gif|jpg|jpeg|png|ico|wmv|avi|asf|asx|mpg|mpeg|mp4|pls|mp3|mid|wav|swf|flv|exe|zip|tar|rar|gz|tgz|bz2|uha|7z|doc|docx|xls|xlsx|pdf|iso)$ { gzip_static off; #add_header Pragma public; add_header Cache-Control "public, must-revalidate, proxy-revalidate"; access_log off; expires 30d; break; } location ~* \.(js)$ { #add_header Pragma public; add_header Cache-Control "public, must-revalidate, proxy-revalidate"; access_log off; expires 30d; break; } location ~* \.(css)$ { #add_header Pragma public; add_header Cache-Control "public, must-revalidate, proxy-revalidate"; access_log off; expires 30d; break; } location ~* \.(txt)$ { #add_header Pragma public; add_header Cache-Control "public, must-revalidate, proxy-revalidate"; access_log off; expires 1d; break; } location ~* \.(eot|svg|ttf|woff)$ { #add_header Pragma public; add_header Cache-Control "public, must-revalidate, proxy-revalidate"; access_log off; expires 30d; break; }Cấu hình cho php-fpm:
Sửa file /etc/php-fpm.conf thành nội dung sau:
;;;;;;;;;;;;;;;;;;;;;; FPM Configuration ;;;;;;;;;;;;;;;;;;;;;;include=/etc/php-fpm.d/*.conf[global]pid = /var/run/php-fpm/php-fpm.piderror_log = /var/log/php-fpm/error.logdaemonize = yes
Xóa các file trong folder /etc/php-fpm.d/ và tạo file config /etc/php-fpm.d/www.conf mới với nộ dung sau:
[www]user = nginxgroup = nginx;listen = 127.0.0.1:9000; WARNING: If you switch to a unix socket, you have to grant your webserver user; access to that socket by setting listen.acl_users to the webserver user.listen = /var/run/php-fpm/www.sock;listen.acl_users = apache,nginx;listen.acl_users = apachelisten.acl_users = nginx;listen.acl_groups =listen.allowed_clients = 127.0.0.1pm = ondemandpm.max_children = 50pm.process_idle_timeout = 10s;pm.max_requests = 500;pm.status_path = /status;ping.path = /ping;ping.response = pongslowlog = /var/log/php-fpm/www-slow.log;env[PATH] = /usr/local/bin:/usr/bin:/bin;env[TMP] = /tmp;env[TMPDIR] = /tmp;env[TEMP] = /tmpphp_admin_value[error_log] = /var/log/php-fpm/www-error.logphp_admin_flag[log_errors] = on;php_admin_value[memory_limit] = 128M; Set data paths to directories owned by process userphp_value[session.save_handler] = filesphp_value[session.save_path] = /var/lib/php/fpm/sessionphp_value[soap.wsdl_cache_dir] = /var/lib/php/fpm/wsdlcache;php_value[opcache.file_cache] = /var/lib/php/fpm/opcache
Thay đổi một số thông số trong file php.ini để phù hợp với worpress:
#sed -i 's/^max_execution_time.*/max_execution_time=300/' /etc/php.ini#sed -i 's/^max_input_time.*/max_input_time=300/' /etc/php.ini#sed -i 's/^post_max_size.*/post_max_size=128M/' /etc/php.ini#sed -i 's/^upload_max_filesize.*/upload_max_filesize=128M/' /etc/php.ini#sed -i "s/^\;date.timezone.*/date.timezone=\'Asia\/Bangkok\'/" /etc/php.ini
 Phần 2: Tạo file cấu hình site cài đặt WordPress
Tạo File cấu hình cho doamain testwp.com tại: /etc/nginx/conf.d/testwp.com.conf có nội dung sau:
server { server_name www.testwp.com; rewrite ^(.*) http://testwp.com$1 permanent; }server { listen 80; access_log off; error_log off; server_name testwp.com; root /home/testwp.com/public_html; index index.php index.htm index.html; limit_conn conn_limit_per_ip 60; limit_req zone=req_limit_per_ip burst=200 nodelay; location / {try_files $uri $uri/ /index.php?$args;} include /etc/nginx/conf/security.conf; location ~ \.php$ { fastcgi_split_path_info ^(.+\.php)(/.+)$; fastcgi_intercept_errors on; fastcgi_index index.php; include fastcgi_params; fastcgi_param SCRIPT_FILENAME $document_root$fastcgi_script_name; fastcgi_connect_timeout 60; fastcgi_send_timeout 180; fastcgi_read_timeout 180; fastcgi_buffer_size 256k; fastcgi_buffers 4 256k; fastcgi_busy_buffers_size 256k; fastcgi_temp_file_write_size 256k; fastcgi_pass php-fpm;} #Include config file in folder /etc/nginx/conf include /etc/nginx/conf/staticfile.conf;}Test thử cấu hình: nginx –t Chạy nginx và php-fpm:
# systemctl restart nginx# systemctl restart php-fpm
Mở port 80 cho http request:
firewall-cmd --zone=public --add-port=80/tcp --permanentfirewall-cmd –reload
 Tạo public_html folder:
mkdir /home/testwp.com/public_html -p
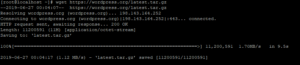
Tải wordpress bản mới nhất:
wget https://wordpress.org/latest.tar.gz
 Giải nén và copy toàn bộ vào public_html folder đã tạo:
# tar -xzvf latest.tar.gz# mv wordpress/* /home/testwp.com/public_html/
Cấp quyền đọc/ghi cho user nginx cho thư mục public_html:
# chown -R nginx:nginx /home/testwp.com/public_html/
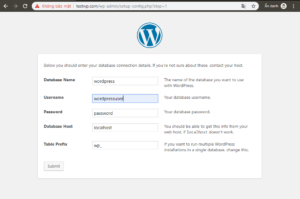
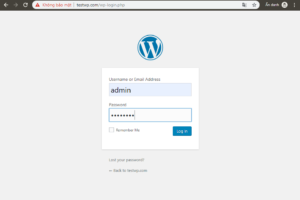
Mở trình duyệt vào truy cập testwp.com:
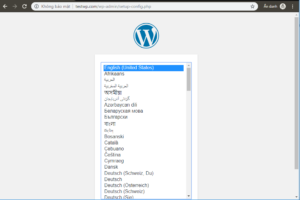
Thành công! Tiếp tục nhập thử thông tin database tạo lúc trước:
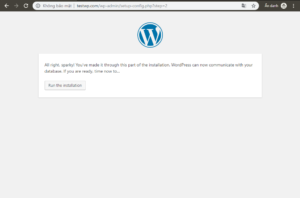
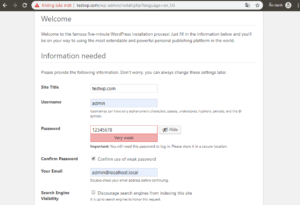
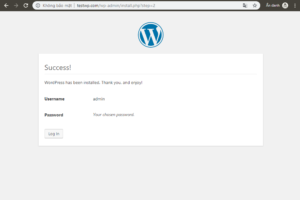
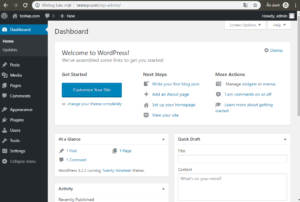
Vậy là xong!
Chúc các bạn thành công.
Mọi đóng góp xin comment bên dưới!