Hiển thị các bài đăng có nhãn Windows Server. Hiển thị tất cả bài đăng

Thứ Hai, 7 tháng 1, 2019

Cài đặt MariaDB phiên bản 5.5

MariaDB là một sản phẩm mã đóng tách ra từ mã mở do cộng đồng phát triển của hệ quản trị cơ sở dữ liệu quan hệ MySQL nhằm theo hướng không phải trả phí với GNU GPL. MariaDB được định hướng để duy trì khả năng tương thích cao với MySQL, để đảm bảo khả năng hỗ trợ về thư viện đồng thời kết hợp một cách tốt nhất với các API và câu lệnh của MySQL. MariaDB đã có công cụ hỗ lưu trữ XtraDB thay cho InnoDB, cũng như một công cụ lưu trữ mới, Aria.

Dưới đây tôi sẽ hướng dẫn các bạn cách cài đặt MariaDB phiên bản 5.5

Phần 1: Cài đặt MariaDB 5.5

  • Ta sử dụng câu lệnh để tiến hành cài đặt:
[root@localhost ~] # yum -y install mariadb-server
  • Sử dụng câu lệnh sau để vào thư mục và tiến hành thay đổi:
[root@localhost ~] # vi /etc/my.cnf# Thêm dòng dưới đây sau phần [mysqld][mysqld]character-set-server=utf8
  • Lưu lại thay đổi và thoát ra bằng lệnh “:wq
  • Ta dùng câu lệnh để bắt đầu và kích hoạt MariaDB:
[root@localhost ~]# systemctl start mariadb [root@localhost ~]# systemctl enable mariadb 

Phần 2: Cài đặt ban đầu cho MariaDB

[root@localhost ~]# mysql_secure_installation NOTE: RUNNING ALL PARTS OF THIS SCRIPT IS RECOMMENDED FOR ALL MariaDB      SERVERS IN PRODUCTION USE!  PLEASE READ EACH STEP CAREFULLY!In order to log into MariaDB to secure it, we'll need the currentpassword for the root user.  If you've just installed MariaDB, andyou haven't set the root password yet, the password will be blank,so you should just press enter here.Enter current password for root (enter for none): # Nhấn EnterOK, successfully used password, moving on...Setting the root password ensures that nobody can log into the MariaDBroot user without the proper authorisation.# Đặt mật khẩuSet root password? [Y/n] # Nhấn chọn yNew password: # Điền password mớiRe-enter new password: # Nhập lại password mớiPassword updated successfully!Reloading privilege tables.. ... Success!By default, a MariaDB installation has an anonymous user, allowing anyoneto log into MariaDB without having to have a user account created forthem.  This is intended only for testing, and to make the installationgo a bit smoother.  You should remove them before moving into aproduction environment.# Xóa người dùng ẩn danhRemove anonymous users? [Y/n] # Nhấn chọn y ... Success!Normally, root should only be allowed to connect from 'localhost'.  Thisensures that someone cannot guess at the root password from the network.# Không cho phép đăng nhập root từ xaDisallow root login remotely? [Y/n] # Nhấn chọn y ... Success!By default, MariaDB comes with a database named 'test' that anyone canaccess.  This is also intended only for testing, and should be removedbefore moving into a production environment.# Xóa cơ sở dữ liệuRemove test database and access to it? [Y/n] # Nhấn chọn y - Dropping test database... ... Success! - Removing privileges on test database... ... Success!Reloading the privilege tables will ensure that all changes made so farwill take effect immediately.# Tải lại các bảng đặc quyềnReload privilege tables now? [Y/n] # Nhấn chọn y ... Success!Cleaning up...All done!  If you've completed all of the above steps, your MariaDBinstallation should now be secure.Thanks for using MariaDB!
  • Kết nối với MariaDB bằng root
[root@localhost ~]# mysql -u root -p Enter password: # Nhập password mà bạn đã đặtWelcome to the MariaDB monitor.  Commands end with ; or \g.Your MariaDB connection id is 3Server version: 5.5.37-MariaDB MariaDB ServerCopyright (c) 2000, 2014, Oracle, Monty Program Ab and others.Type 'help;' or '\h' for help. Type '\c' to clear the current input statement.# Hiển thị danh sách người dùngMariaDB [(none)]> select user,host,password from mysql.user; +------+-----------+-------------------------------------------+| user | host      | password                                  |+------+-----------+-------------------------------------------+| root | localhost | *xxxxxxxxxxxxxxxxxxxxxxxxxxxxxxxxxxxxxxxx || root | 127.0.0.1 | *xxxxxxxxxxxxxxxxxxxxxxxxxxxxxxxxxxxxxxxx || root | ::1       | *xxxxxxxxxxxxxxxxxxxxxxxxxxxxxxxxxxxxxxxx |+------+-----------+-------------------------------------------+3 rows in set (0.00 sec)# Hiển thị danh sách cơ sở dữ liệuMariaDB [(none)]> show databases; +--------------------+| Database           |+--------------------+| information_schema || mysql              || performance_schema |+--------------------+3 rows in set (0.00 sec)MariaDB [(none)]> exitBye
  • Nếu Firewalld đang chạy và MariaDB cũng được sử dụng từ các Máy chủ từ xa, bạn hãy cho phép dịch vụ MariaDB sử dụng 3306 / TCP.
[root@localhost ~]# firewall-cmd --add-service=mysql --permanent success[root@localhost ~]# firewall-cmd --reload success

Vậy là đã xong

Chúc các bạn thành công!
Cài đặt Apache httpd để cấu hình máy chủ web

Apache hay là chương trình máy chủ HTTP là một chương trình dành cho máy chủ đối thoại qua giao thức HTTP. Apache chạy trên các hệ điều hành tương tự như Unix, Microsoft Windows, Novell Netware và các hệ điều hành khác. Nó có một vai trò quan trọng trong quá trình phát triển của mạng web thế giới. Chính vậy tôi sẽ hướng dẫn các bạn cách cài đặt và cấu hình chương trình này.

Phần 1: Cài đặt httpd

  • Ta tiến hành cài đặt httpd như sau:
[root@localhost ~] # yum -y install httpd# Xóa trang chào mừng[root@localhost ~] # rm -f /etc/httpd/conf.d/welcome.conf

Phần 2: Cấu hình httpd

  • Ta sử dụng dòng lệnh sau đây để vào thư mục cấu hình và tiến hành thay đổi thông tin:
[root@localhost ~]# vi /etc/httpd/conf/httpd.conf# Dòng 86: Thay đổi địa chỉ email quản trị viênServerAdmin root@centos.word# Dòng 95: Thay đổi tên máy chủ của bạnServerName www.centos.word:80# Dòng 151: Thay đổi None thành AllAllowOverride All# Dòng 164: Thêm tên các tệp sauDirectoryIndex index.html index.cgi index.php# Thêm 2 câu sau vào cuối dòngServerTokens ProdKeepAlive On
  • Sau khi thay đổi ta lưu lại và thoát ra bằng lệnh “:wq”
  • Ta dùng câu lệnh sau để bắt đầu và kích hoạt httpd:
[root@localhost ~]# systemctl start httpd [root@localhost ~]# systemctl enable httpd 
  • Nếu Firewalld đang chạy, ta thục hiện thay đổi cho phép dịch vụ HTTP, HTTPD sử dụng 80/TCP
[root@localhost ~]# firewall-cmd --add-service=http --permanent success[root@localhost ~]# firewall-cmd --reload success
  • Tạo một trang để kiểm tra HTML đã hoạt động hay chưa:
[root@localhost ~] # vi /var/www/html/index.html<html><body><div style="width: 100%; font-size: 40px; font-weight: bold; text-align: center;">Test Page</div></body></html>
  • Các bạn hãy mở trình duyệt và điều hướng theo đường dẫn http://your_server_ip_address/ (IP máy chủ của bạn). Nếu hiển thị như dưới đây thì ta đã hoàn thành:

Phần 3: Cấu hình httpd để sử dụng các tập lệnh PHP

  • Cài đặt PHP và cấu hình:
[root@localhost ~]# yum -y install php php-mbstring php-pear[root@localhost ~]# vi /etc/php.ini# Dòng 878: Bỏ dấu "#" và thêm múi giờ của bạn vào date.timezone = "Asia/Ho_Chi_Minh"[root@localhost ~]# systemctl restart httpd
  • Tạo tiếp tục tạo một trang để kiểm tra PHP đã hoạt động hay chưa:
[root@localhost ~] # vi /var/www/html/index.php <html> <body> <div style = "width: 100%; font-size: 40px; font-weight: bold; text-align: centre;"> <? php    print Date ("Y / m / d") ; ?> </ div> </ body> </ html>
  • Bạn mở trình duyệt và điều hướng theo đường dẫn http://your_server_ip_address/index.php (IP máy chủ của bạn). Nếu hiển thị thì PHP đã hoạt động.

Chúc các bạn thành công!


Thứ Tư, 29 tháng 11, 2017

Một vài lệnh powershell hữu ích để kết nối mạng

Bài viết chỉ dành cho những ai quen dùng cửa sổ console 🙂

Một vài lệnh hữu ích trong windows liên quan đển Network Adapter

Để bắt đầu, bạn hãy mở cửa sổ command promt hoặc Windows Powershell bằng cách ấn chuột phải vào Start Menu (trên windows 8/10) và chọn Command Promt, nhớ chạy với quyền Admin nhé.

Tôi sử dụng windows 10 nên sẽ sử dụng Powsershell, mặc định mọi lệnh của command promt đều thực hiện được trên Windows Powsersehll.

Lệnh lấy thông tin Network Adapter trong máy tính:

Get-NetAdapter [[-Name] <String[]> ] [-AsJob] [-CimSession <CimSession[]> ] [-IncludeHidden] [-Physical] [-ThrottleLimit <Int32> ] [ <CommonParameters>]

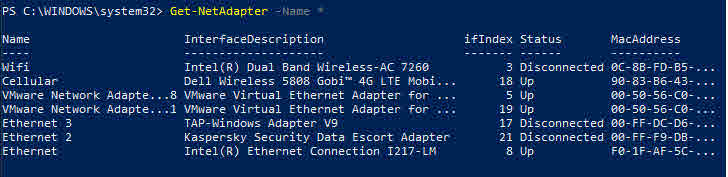
Để lấy thông tin tất cả các Network Adapter trong máy tính ta dùng lênh sau:

Get-NetAdapter -Name *

Hoặc muốn hiện tất cả các Card, bao gồm cả card ảo và card ẩn:

Get-NetAdapter -Name * -IncludeHidden

Note: Trên Commad Promt hoặc trong PS có thể dùng lệnh netsh.exe như sau:

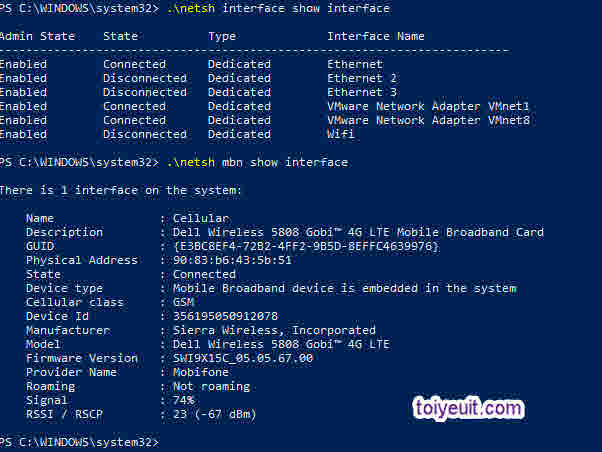
netsh interface show interface

Để hiện kết nối 3G :

netsh mbn show interface

Lệnh Bât/Tăt network Adapter:

Cần nhớ tên (Name của Interface)

Disable-NetAdapter "Ethernet" -Confirm:$falseEnable-NetAdapter "Ethernet"

Có thể bật / tắt tất cả các Adapter bằng lệnh sau:

Get-NetAdapter | ? status -ne up | Disable-NetAdapter -Confirm:$false

Lệnh Gán IP tĩnh cho Network Adapter:

New-NetIPAddress -InterfaceAlias "Ethernet" -IPAddress "192.168.1.160" -PrefixLength 24 -DefaultGateway 192.168.1.1

Lệnh GÁN DHCP cho Network Adapter:

Set-NetIPInterface -InterfaceAlias "Ethernet" -DHCP Enable

Lệnh Gán DNS cho Network Adapter:

Set-DnsClientServerAddress -InterfaceAlias “Ethernet” -ServerAddresses 192.168.0.1, 192.168.0.2

Để lấy DNS tự động từ DHCP server:

Set-DnsClientServerAddress -InterfaceAlias "Ethernet" -ResetServerAddresses

Trên đây là Một vài lệnh powershell hữu ích mà bạn có thể sử dụng ngay trên máy tính để phục vụ công việc thuận lợi hơn.

Chúc các bạn thành công!